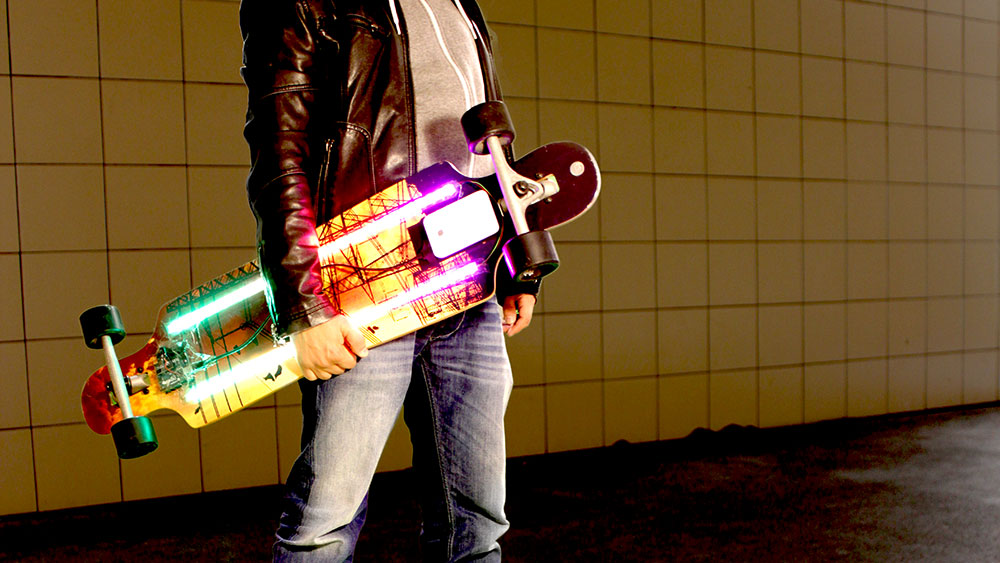
Es ist Sommer und höchste Zeit, die Longboards zu tunen. Heute ist die animierte Version mit adressierbaren LEDs und Arduino dran.
Bauteile
- WS2812 LED-Strips
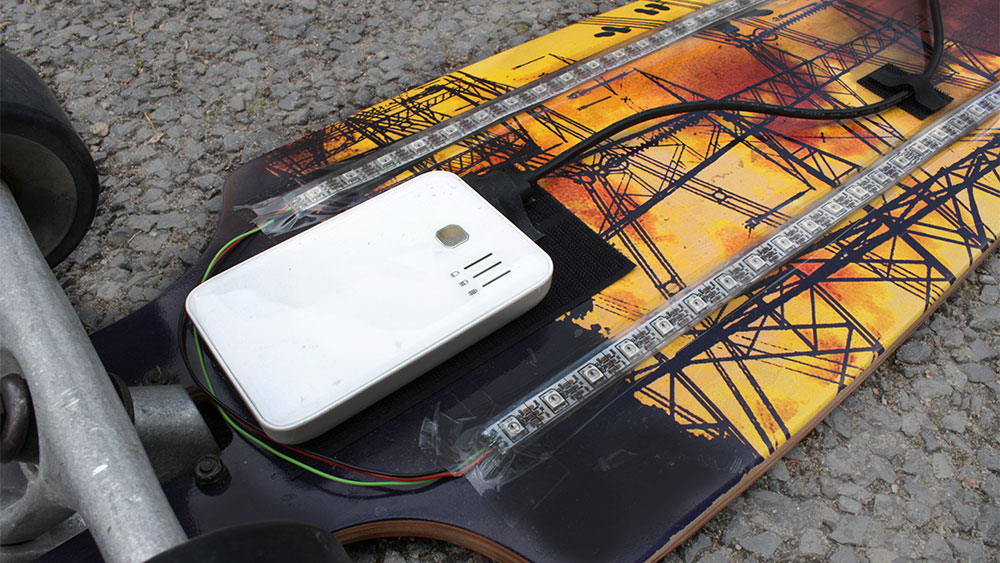
- Powerbank
Schaltplan
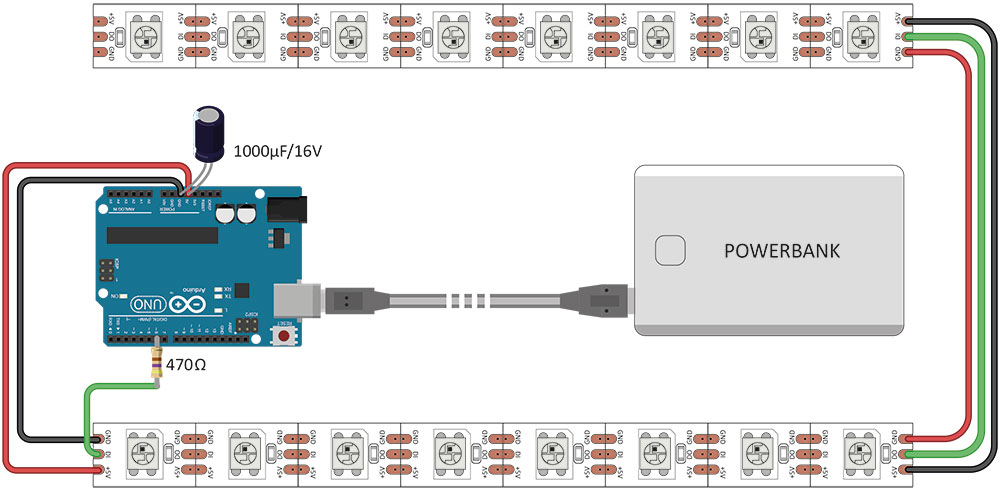
Wir brauchen also zwei LED-Stripes mit adressierbaren LEDs (WS2812). Normale LED-Strips funktionieren nicht. Man kann die Stripes übrigens einfach an den Übergabestellen durchschneiden, wenn sie zu lang sein sollten. Genau so macht man auch aus einem zwei LED-Strips.
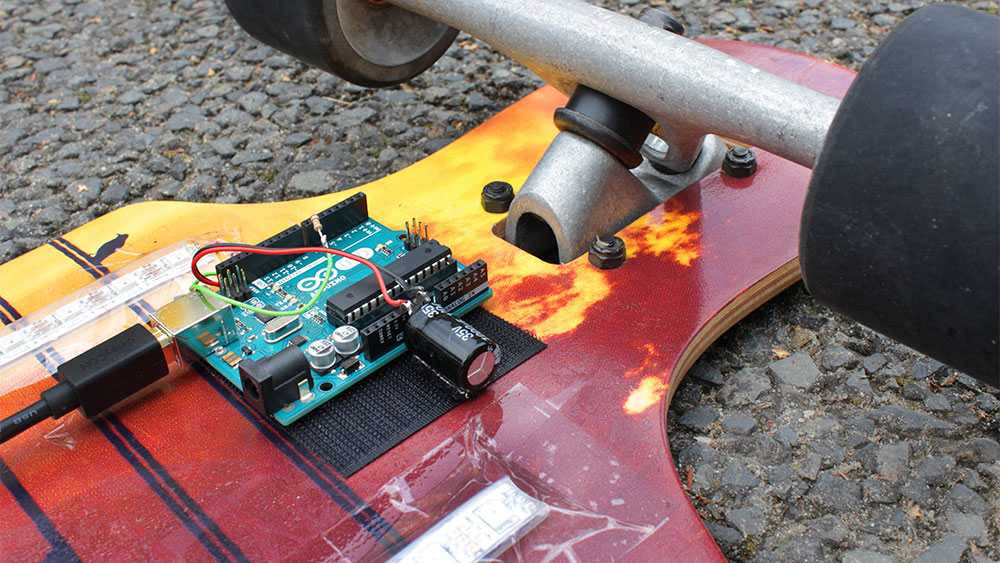
Der Vin und der GND werden direkt mit den Arduino verbunden. Ein großer Kondensator glättet Spannungsspitzen. Der Datenpin des LED-Strips wird über einen Widerstand mit dem Digital Out 6 vom Arduino verbunden. Das grüne Kabel sollte so kurz wie möglich sein. Fehlt nur noch der Code.
Arduino-Code
Den Code kannst du hier herunterladen. Du brauchst auf jeden Fall die Adafruit NeoPixel Library. Die lässt sich in der Arduino-Software einfach im Bibliotheksverwalter (unter Sketch>Bibliothek einbinden>Bibliotheken verwalten …) suchen und einbinden.
Bleibt mir nur, dir viel Spaß zu wünschen :-) Schreib mir, ob alles geklappt hat.
#include <Adafruit_NeoPixel.h>
#include <avr/power.h>

#define PIN 6

/*
GLOWBOARD CODE
Quelle: https://starthardware.org/wie-baut-man-ein-glowboard-mit-arduino/

Achtung! Du musst die Anzahl der LEDs anpassen. Bei mir waren es 68. Ändere die Variable ledsGesamt.
*/

int ledsGesamt = 68;

// Parameter 1 = number of pixels in strip
// Parameter 2 = Arduino pin number (most are valid)
// Parameter 3 = pixel type flags, add together as needed:
//   NEO_KHZ800  800 KHz bitstream (most NeoPixel products w/WS2812 LEDs)
//   NEO_KHZ400  400 KHz (classic 'v1' (not v2) FLORA pixels, WS2811 drivers)
//   NEO_GRB     Pixels are wired for GRB bitstream (most NeoPixel products)
//   NEO_RGB     Pixels are wired for RGB bitstream (v1 FLORA pixels, not v2)

Adafruit_NeoPixel strip = Adafruit_NeoPixel(ledsGesamt, PIN, NEO_GRB + NEO_KHZ800);

// IMPORTANT: To reduce NeoPixel burnout risk, add 1000 uF capacitor across
// pixel power leads, add 300 - 500 Ohm resistor on first pixel's data input
// and minimize distance between Arduino and first pixel.  Avoid connecting
// on a live circuit...if you must, connect GND first.

void setup() {
  // This is for Trinket 5V 16MHz, you can remove these three lines if you are not using a Trinket
  #if defined (__AVR_ATtiny85__)
  if (F_CPU == 16000000) clock_prescale_set(clock_div_1);
  #endif
  // End of trinket special code

  strip.begin();
  strip.show(); // Initialize all pixels to 'off'
}

void loop() {
  // Some example procedures showing how to display to the pixels:
  colorWipe(strip.Color(255, 0, 0), 30); // Red
  colorWipe(strip.Color(0, 255, 0), 30); // Green
  colorWipe(strip.Color(0, 0, 255), 30); // Blue
  // Send a theater pixel chase in...
  theaterChase(strip.Color(127, 127, 127), 50); // White
  /*theaterChase(strip.Color(127,   0,   0), 50); // Red
  theaterChase(strip.Color(  0,   0, 127), 50); // Blue*/

  /*  rainbow(10);*/
  rainbowCycle(5);
  theaterChaseRainbow(40);
}

// Fill the dots one after the other with a color
void colorWipe(uint32_t c, uint8_t wait) {
  for(uint16_t i=0; i<strip.numPixels()/2; i++) {
      strip.setPixelColor(i, c);
      strip.setPixelColor(strip.numPixels()-i, c);
      strip.show();
      delay(wait);
  }
}

void rainbow(uint8_t wait) {
  uint16_t i, j;

  for(j=0; j<256; j++) {
    for(i=0; i<strip.numPixels()/2; i++) {
      strip.setPixelColor(i, Wheel((i+j) & 255));
      strip.setPixelColor(strip.numPixels()-i, Wheel((i+j) & 255));
    }
    strip.show();
    delay(wait);
  }
}

// Slightly different, this makes the rainbow equally distributed throughout
void rainbowCycle(uint8_t wait) {
  uint16_t i, j;

  for(j=0; j<256*5; j++) { // 5 cycles of all colors on wheel
    for(i=0; i< strip.numPixels()/2; i++) {
      strip.setPixelColor(strip.numPixels()/2-i, Wheel(((i * 256 / strip.numPixels()) + j) & 255));
      strip.setPixelColor(strip.numPixels()/2+i, Wheel(((i * 256 / strip.numPixels()) + j) & 255));
    }
    strip.show();
    delay(wait);
  }
}

//Theatre-style crawling lights.
void theaterChase(uint32_t c, uint8_t wait) {
  for (int j=0; j<40; j++) {  //do 10 cycles of chasing
    for (int q=0; q < 3; q++) {
      for (int i=0; i < strip.numPixels()/2; i=i+3) {
        strip.setPixelColor(i+q, c);    //turn every third pixel on
        strip.setPixelColor(strip.numPixels()-(i+q), c);    //turn every third pixel on
      }
      strip.show();

      delay(wait);

      for (int i=0; i < strip.numPixels()/2; i=i+3) {
        strip.setPixelColor(i+q, 0);        //turn every third pixel off
        strip.setPixelColor(strip.numPixels()-(i+q), 0);        //turn every third pixel off
      }
    }
  }
}

//Theatre-style crawling lights with rainbow effect
void theaterChaseRainbow(uint8_t wait) {
  for (int j=0; j < 256; j++) {     // cycle all 256 colors in the wheel
    for (int q=0; q < 3; q++) {
        for (int i=0; i < strip.numPixels()/2; i=i+3) {
          strip.setPixelColor(i+q, Wheel( (i+j) % 255));    //turn every third pixel on
          strip.setPixelColor(strip.numPixels()-(i+q), Wheel( (i+j) % 255));    //turn every third pixel on
        }
        strip.show();

        delay(wait);

        for (int i=0; i < strip.numPixels()/2; i=i+3) {
          strip.setPixelColor(i+q, 0);        //turn every third pixel off
          strip.setPixelColor(strip.numPixels()-(i+q), 0);        //turn every third pixel off
        }
    }
  }
}

// Input a value 0 to 255 to get a color value.
// The colours are a transition r - g - b - back to r.
uint32_t Wheel(byte WheelPos) {
  WheelPos = 255 - WheelPos;
  if(WheelPos < 85) {
   return strip.Color(255 - WheelPos * 3, 0, WheelPos * 3);
  } else if(WheelPos < 170) {
    WheelPos -= 85;
   return strip.Color(0, WheelPos * 3, 255 - WheelPos * 3);
  } else {
   WheelPos -= 170;
   return strip.Color(WheelPos * 3, 255 - WheelPos * 3, 0);
  }
}
Wenn dir das Projekt gefallen hat und du von weiteren interessanten Projekten inspiriert werden willst, sieh dir doch mal mein neues E-Book »Arduino Projekte Volume 1« an!
- Die beliebtesten Arduino-Projekte von StartHardware
- Inklusive Schaltplan, Beschreibung und Code
- Arduino-Schnellstart-Kapitel
- Kompakter Programmierkurs
Nett, aber ich würde statt des Arduino einen Digispark ATTiny85 nehmen. Viel kleiner und damit einfacher zu verbauen, und verbraucht auch weniger Strom.
Guter Hinweis. Die meisten Leute haben ein Arduino UNO, deshalb baue ich alle Tutorials immer auf der Plattform auf. Übrigens wäre ein Arduino NANO in (fast) der gleichen Preisklasse, hat aber den gleichen Chip wie das UNO-Board.
Wieviele Neopixel hintereinander in der Chain kann denn der Uno R3 ansteuern, ohne dass es zu Geschwindigkeits-Problemen kommt?