

In the previous chapters we covered the output variants of the NodeMCU, now lets get a value back from it. We are using the LDR what stands for light dependant resistor.
Circuit
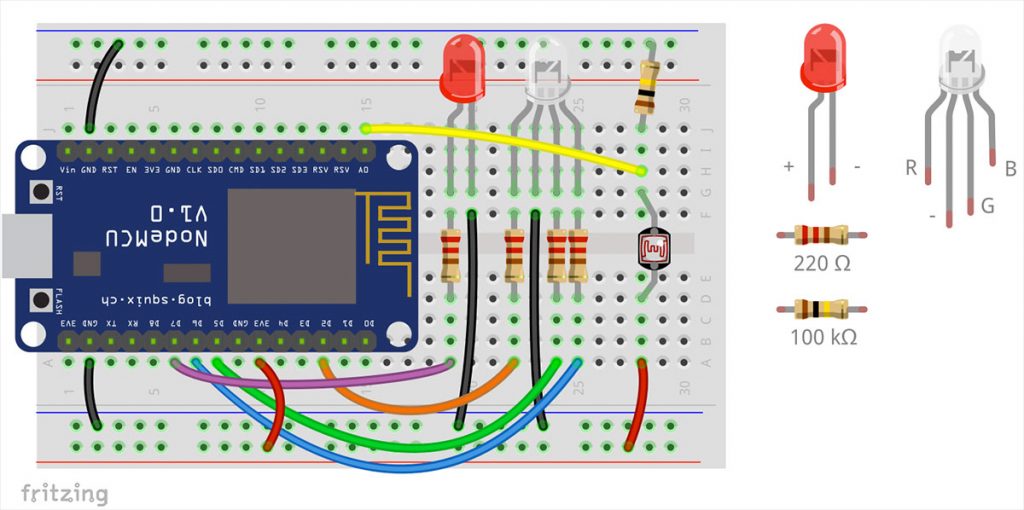
Extend the circuit with the LDR and a resistor of 100kOhm (brown-black-yellow). It is a series circuit going from GND to the resistor and from there through the LDR into the 3.3V+. It is called voltage divider. The junction of the resistor and LDR is connected to the analog input of the NodeMCU.

Code
The code only extends the analog output by delivering a new element to the webpage.
#include <ESP8266WiFi.h>
#include <ESP8266WebServer.h>

const char* ssid  = "IoTBerlin-Meetup";        // Wifi name (SSID)
const char* password = "s3mant1cs!";  // Wifi password

ESP8266WebServer server(80);    // Server port
String Temp = "";

int d2pin = D2;   // RGB LED - Red
int d2state = 255;

int d5pin = 14;   // RGB LED - Green
int d5state = 255;

int d6pin = 12;   // RGB LED - Blue
int d6state = 255;

int d7pin = D7;
int d7state = 0;

int analogPin = A0;

String HTML_header = "<!DOCTYPE html><html><head>    <meta content=\"text/html; charset=ISO-8859-1\" http-equiv=\"content-type\">    <meta http-equiv=\"refresh\" content=\"5\">    <title>WebSchalter</title></head><style>    html {        background-color: grey;    }    body {        margin: auto;                margin-top: 60px;    }    button {        height: 120px;        width: 100%;        font-size: 48px;        background-color: cornflowerblue;        border: none;        color: white;        margin-bottom: 10px;    }        button:active {        background-color: darkturquoise;        color: white;        border: none;    }        button.on{        background-color: red;    }    a {        text-decoration: none;    }        </style><body><a href=\"/args?d2pin=255&d5pin=0&d6pin=0\"><button>RED</button></a><a href=\"/args?d2pin=0&d5pin=255&d6pin=0\"><button>GREEN</button></a><a href=\"/args?d2pin=0&d5pin=0&d6pin=255\"><button>BLUE</button></a>";
String HTML_d7_off = "<a href=\"/args?d7pin=1\"><button>d7 - LED</button></a>";
String HTML_d7_on = "<a href=\"/args?d7pin=0\"><button class=\"on\">d7 - LED</button></a>";

String HTML_footer = "</body></html>";
/* ***** ***** ***** ***** Setup ***** ***** ***** ***** */
void setup()
{
  pinMode(d2pin , OUTPUT);                  // D2 set as Output
  pinMode(d5pin , OUTPUT);                  // D5 set as Output
  pinMode(d6pin , OUTPUT);                  // D6 set as Output
  pinMode(d7pin , OUTPUT);                  // D7 set as Output
  Serial.begin(115200);                     // start serial communication
  connectToWifi();                          // start wifi
}

/* ***** Webpage: executed when "http://<ip address>/" is called ***** */

void the_webpage() {
  Temp = HTML_header;                        // top part of the html

  if (d7state == 1) {                        // d7 part of html page – the html code for a button
    Temp += HTML_d7_on;
  } else {
    Temp += HTML_d7_off;
  }

  Temp += "<button>LDR: ";
  Temp += analogRead(analogPin);             // putting out the analog value
  Temp += "</button>";


  Temp += HTML_footer;                       // bottom part of the html page
  server.send(200, "text/html", Temp);       // serving the html page
}

/* ***** ***** ***** ***** Event Functions ***** ***** ***** ***** */

void handleArgs() {

  if (server.arg("d2pin")!= ""){             // if specific argument is not empty
    d2state = server.arg("d2pin").toInt();   // set d2 pin to received argument
  }
  if (server.arg("d5pin")!= ""){             // if specific argument is not empty
    d5state = server.arg("d5pin").toInt();   // set d5 pin to received argument
    Serial.println(d5state);
  }
  if (server.arg("d6pin")!= ""){             // if specific argument is not empty
    d6state = server.arg("d6pin").toInt();   // set d6 pin to received argument
  }
  if (server.arg("d7pin")!= ""){             // if specific argument is not empty
    d7state = server.arg("d7pin").toInt();   // set d7 pin to received argument
  }

  the_webpage();                             // deliver webpage
}

/* ***** ***** ***** Wifi Functions ***** ***** ***** */

void showStates(){                           // map all states to pins
  digitalWrite(d7pin, d7state);              // LED
  analogWrite(d2pin, d2state);               // RGB LED red
  analogWrite(d5pin, d5state);               // RGB LED green
  analogWrite(d6pin, d6state);               // RGB LED blue
}

/* ***** ***** ***** ***** Loop ***** ***** ***** ***** */

void loop() {
  server.handleClient();                     // update function for server
  showStates();                              // map states to pins
  delay(10);                                 // some time to process
}

/* ***** ***** ***** Wifi Functions ***** ***** ***** */

void connectToWifi() {
  Serial.println();
  Serial.print("Connect to"); Serial.println(ssid);
  WiFi.begin(ssid, password);

  while (WiFi.status() != WL_CONNECTED) {
    delay(500);
    Serial.print(".");
  }

  Serial.println("");
  Serial.println("Wifi connected");


  delay(2000);
  Serial.println();
  Serial.println("IP addresse of the web server is: ");
  Serial.println(WiFi.localIP());   // output the ip
  server.on("/", the_webpage);      // show website on root call
  server.on("/args", handleArgs);   // associate the handler function to the path
  server.begin();                   // start the server
  Serial.println ("Webserver running, waiting for ESP8266 ...");
}
Now, you can use the value to influence the behaviour of your Christmas decoration and of course you should now build come cool things from it. Christmas stars, disco balls – what ever you can imagine. Have fun with it!
The Complete Tutorial
- Interactive Christmas Decoration – Part 1: Preparation
- Interactive Christmas Decoration – Part 2: Make it blink
- Interactive Christmas Decoration – Part 3: Server and LED
- Interactive Christmas Decoration – Part 4: Server, LED, RGB
- Interactive Christmas Decoration – Part 5: Analog Input with LDR
Dieser Beitrag ist auch auf Deutsch verfügbar: Workshop: Interaktive Weihnachtsdekoration Teil 5 – Analoger Input mit LDR