
Now, it is time to make some blink! In this part you will learn how you can utilize the Breadboard and what a digital output is. Finally you will make an LED blink 🙂
In order to sketch circuits we will use the breadboard. Equipped with a lot of internally connected holes it makes prototyping easy. You can simply stick components in and they will stay in place. In the following image you can see, in which way the holes of a breadboard are connected.
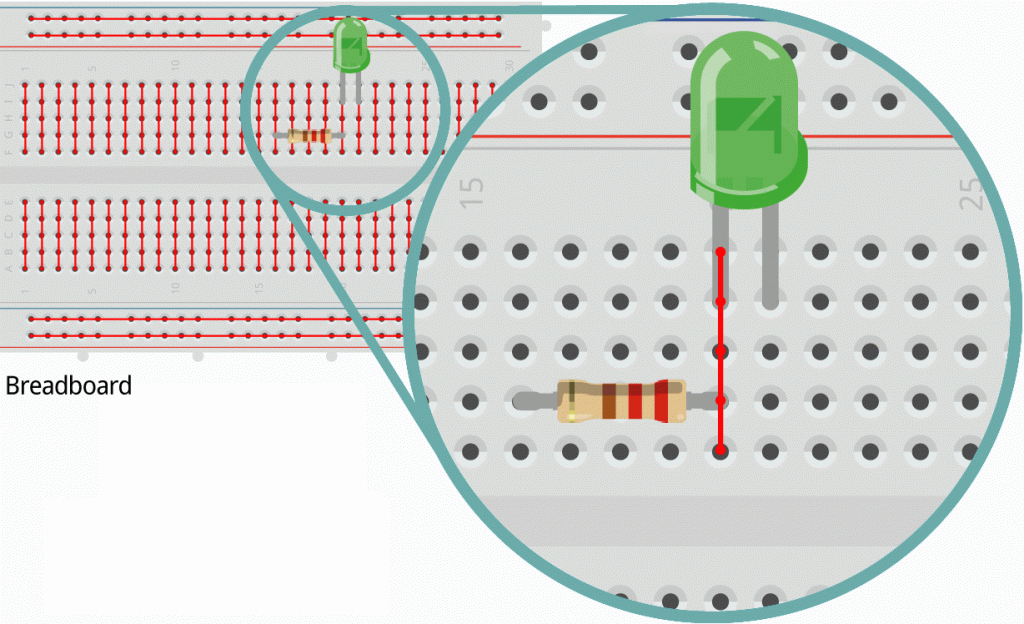
In the image you can see that the resistor (the orange part) and the LED are placed in the same row. This creates an electrical connection.
The first circuit
Build up the following circuit on your breadboard. Push the NodeMCU gently into the breadboard so that the first pins are on the very left side. Make sure that you leave one pin row on top and on bottom of the NodeMCU.
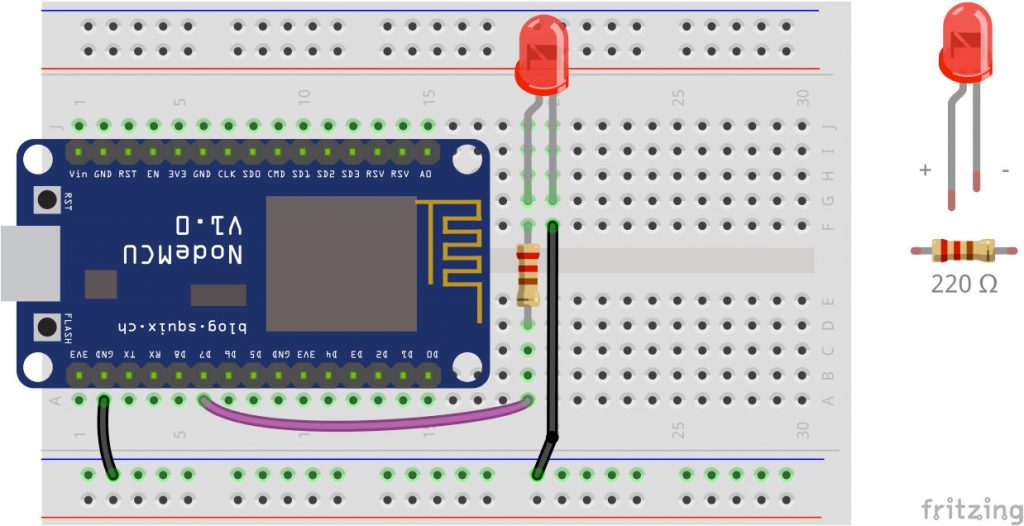
The circuit now goes from the GND of the NodeMCU (bottom left corner) to the black cable on the right. This is connected to the short leg of the LED (cathode). The long leg (anode) is connected to a resistor (220 Ohms). The resistor is reducing the current so that the LED is protected from burning. The resistor then is connected to the Digital Pin 7 of the NodeMCU. Now we have to program it!
The first program
Copy and past the following code into the Arduino-Software and upload it to your NodeMCU. Therefore on the menu just click on Sketch>Upload or click the Upload-Button (Arrow to the right) in the menu bar.
int ledPin = D7;

void setup() {
  // put your setup code here, to run once:
  pinMode(ledPin, OUTPUT);
}

void loop() {
  // put your main code here, to run repeatedly:
  digitalWrite(ledPin,HIGH);
  delay(1000);
  digitalWrite(ledPin,LOW);
  delay(1000);
}
Is it blinking? Great! As you can see, we have two main methods. The setup() method is only executed once while the loop() method is constantly repeated. The command digitalWrite(ledPin,HIGH); is switching the LED on, digitalWrite(ledPin,LOW); switches it off again. The command delay(1000) is stopping the program for 1000 milliseconds.
Now make it blink faster 🙂
The Complete Tutorial
- Interactive Christmas Decoration – Part 1: Preparation
- Interactive Christmas Decoration – Part 2: Make it blink
- Interactive Christmas Decoration – Part 3: Server and LED
- Interactive Christmas Decoration – Part 4: Server, LED, RGB
- Interactive Christmas Decoration – Part 5: Analog Input with LDR
Dieser Beitrag ist auch auf Deutsch verfügbar: Workshop: Interaktive Weihnachtsdekoration Teil 2 – Blink

Pingback: Interactive Christmas Decoration – Part 5: Analog Input with LDR - StartHardware - Tutorials for Arduino
Pingback: Workshop: Interaktive Weihnachtsdekoration Teil 2 – Blink – Arduino Tutorial
Pingback: Interactive Christmas Decoration – Part 3: Server and LED - StartHardware - Tutorials for Arduino
Pingback: Interactive Christmas Decoration – Part 1 - StartHardware - Tutorials for Arduino
Pingback: Interactive Christmas Decoration – Part 4: Server, LED, RGB - StartHardware - Tutorials for Arduino