The DFPlayer Mini MP3 Player for Arduino* is a small and inexpensive MP3 module with direct output for a speaker. The module can be used as a standalone module with battery, speaker and push buttons or in combination with an Arduino UNO or any other controller with RX/TX capabilities. The music data is stored on a micro SD card.
The manufacturer is Flyrontech and the module is also available under the name FN-M19P.
Specification
- Supported sampling rates (kHz): 8/11.025/12/12/16/22.05/24/32/44.1/48
- 24 -Bit-DAC-output, support for dynamic range 90dB , SNR-Unterstützung 85dB
- Full support FAT16 , FAT32 file systems, maximum support 32GB of TF card, support 32G of the U-Disc, 64M Bytes NORFLASH
- A variety of control modes, I/O control mode, serial mode, AD key control mode
- Advertising sound waiting function, the music can be interrupted. when the advertising is over, the music will continue to play
- Audio data sorted by folders, supports up to 100 folders, each folder can hold up to 255 songs
- Volume adjustable to 30 levels, EQ adjustable to 6 levels
Application
- Voice transmission of car navigation
- Voice instructions at train stations and in vehicles
- Voice instructions in the fields of electricity, communication and finance
- Public safety voice prompts
- Multi-channel voice alarm or equipment operating instructions
- Voice instructions for safe driving with the electric tourist car
- Alarm in case of electromechanical equipment failure
- Voice instructions for fire alarm
- Automatic transmitters, regular broadcasting.
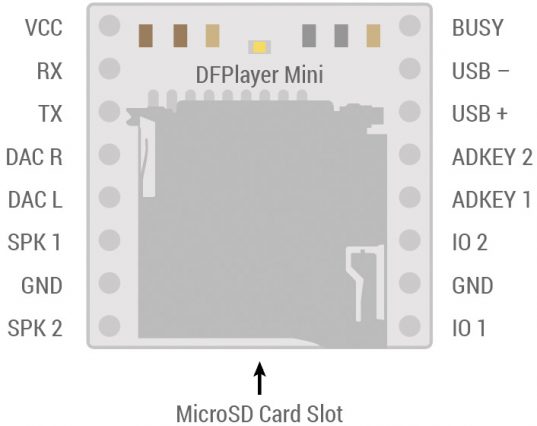
Pin Assignment

| pin | description | comment |
| vcc | input voltage | DC3,2~5,0V;Typ: DC4,2V; TYP: DC4,2V |
| RX | serial UART input | |
| TX | serial UART output | |
| DAC_R | audio output right channel | headphones and amplifier |
| DAC_L | audio output left channel | headphones and amplifier |
| SPK2 | speaker – | speaker smaller than 3 W |
| GND | GND | GND |
| SPK1 | speaker + | speaker smaller than 3 W |
| IOl | trigger connector 1 | short press to play previous track, long press to decrease volume |
| GND | GND | GND |
| 102 | trigger connector 2 | short press to play next track, long press to increase volume |
| ADKEY1 | AD connector 1 | trigger first segment |
| ADKEY2 | AD connector 2 | trigger fifth segment |
| USB+ | USB* DP | USB port |
| USB- | USB- DM | USB port |
| BUSY | playback status | LOW means play, HIGH means do not play |
Usage with the Arduino
The DFPlayer Mini has different operating modes. These include Serial mode, in which commands can be received via the computer’s serial port, AD Key mode (Stand Alone), in which many buttons can be read with specific series resistors, and I/O mode, which is used when used with the Arduino board. In the following, this tutorial will deal with the latter case.
I/O Mode with Arduino
In the I/O mode of the DFPlayer Mini a serial communication between Arduino and DFPlayer is used. Control signals can then be sent directly to the player via a special program library.
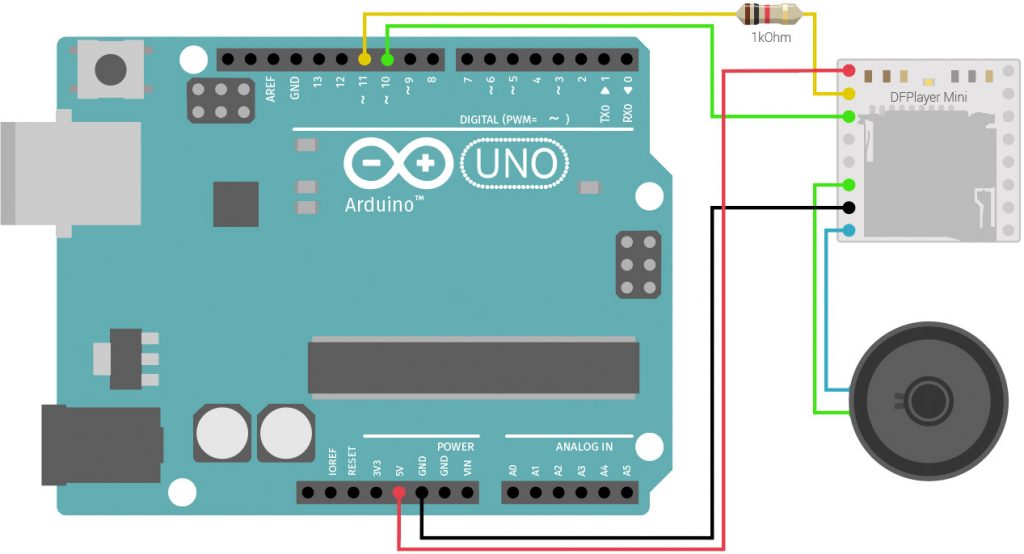
Wiring diagram: DFPlayer Mini with Arduino

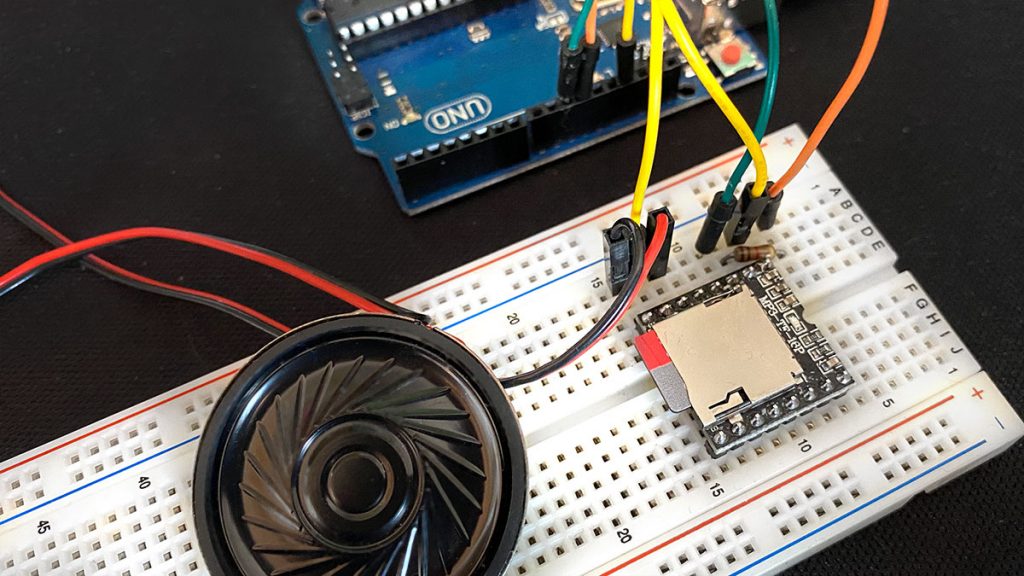
The DFPlayer is first connected to 5V+ and GND, then its RX and TX pins are connected to the Arduino pins 10 and 11. In order not to block the native RX and TX pins of the Arduino (0 and 1), we use the software serial library. It allows to use a second serial port on other pins. The last thing to do is to connect a speaker to the DFPlayer. Alternatively it would be possible to connect a preamplifier or headphones to the pins DAC_L, DAC_R and GND instead of the speaker. So here a stereo output would also be possible.
Components
- or similar
- DFPlayer Mini*
- MicroSD card*
- Speaker*
SD Card
The SD card must be formatted in FAT16 or FAT32 format. On Mac, the partition table must also be set to master boot record. If this setting is not made, the SD card will not be recognized and the DFPlayer module will not be initialized.
Once the card is formatted, MP3 files can be copied to it. They are played in the order in which they were copied to the card. The DFPlayer should be able to manage up to 100 folders with up to 255 MP3s. I have not tested this 😉
Software Preparation
To use the DFPlayer the program library DFRobotDFPlayerMini must be installed. To do this, go to the menu Sketch>Include Library>Manage Libraries … in the Arduino software. and enter DFPlayer in the search field. Install the mentioned library DFRobotDFPlayerMini.
Example Code
The following code is the sample code you can find after installing the program library in the menu under File>Examples>DFRobotDFPlayerMini>GetStarted. It plays all the MP3s on the SD card for three seconds each and then moves to the next file.
/***************************************************
DFPlayer - A Mini MP3 Player For Arduino
 <https://www.dfrobot.com/product-1121.html>

 ***************************************************
 This example shows the basic function of library for DFPlayer.

 Created 2016-12-07
 By [Angelo qiao](Angelo.qiao@dfrobot.com)

 GNU Lesser General Public License.
 See <http://www.gnu.org/licenses/> for details.
 All above must be included in any redistribution
 ****************************************************/

/***********Notice and Trouble shooting***************
 1.Connection and Diagram can be found here
 <https://www.dfrobot.com/wiki/index.php/DFPlayer_Mini_SKU:DFR0299#Connection_Diagram>
 2.This code is tested on Arduino Uno, Leonardo, Mega boards.
 ****************************************************/

#include "Arduino.h"
#include "SoftwareSerial.h"
#include "DFRobotDFPlayerMini.h"

SoftwareSerial mySoftwareSerial(10, 11); // RX, TX
DFRobotDFPlayerMini myDFPlayer;
void printDetail(uint8_t type, int value);

void setup()
{
  mySoftwareSerial.begin(9600);
  Serial.begin(115200);

  Serial.println();
  Serial.println(F("DFRobot DFPlayer Mini Demo"));
  Serial.println(F("Initializing DFPlayer ... (May take 3~5 seconds)"));

  if (!myDFPlayer.begin(mySoftwareSerial)) {  //Use softwareSerial to communicate with mp3.
    Serial.println(F("Unable to begin:"));
    Serial.println(F("1.Please recheck the connection!"));
    Serial.println(F("2.Please insert the SD card!"));
    while(true){
      delay(0); // Code to compatible with ESP8266 watch dog.
    }
  }
  Serial.println(F("DFPlayer Mini online."));

  myDFPlayer.volume(10);  //Set volume value. From 0 to 30
  myDFPlayer.play(1);  //Play the first mp3
}

void loop()
{
  static unsigned long timer = millis();

  if (millis() - timer > 3000) {
    timer = millis();
    myDFPlayer.next();  //Play next mp3 every 3 second.
  }

  if (myDFPlayer.available()) {
    printDetail(myDFPlayer.readType(), myDFPlayer.read()); //Print the detail message from DFPlayer to handle different errors and states.
  }
}

void printDetail(uint8_t type, int value){
  switch (type) {
    case TimeOut:
      Serial.println(F("Time Out!"));
      break;
    case WrongStack:
      Serial.println(F("Stack Wrong!"));
      break;
    case DFPlayerCardInserted:
      Serial.println(F("Card Inserted!"));
      break;
    case DFPlayerCardRemoved:
      Serial.println(F("Card Removed!"));
      break;
    case DFPlayerCardOnline:
      Serial.println(F("Card Online!"));
      break;
    case DFPlayerUSBInserted:
      Serial.println("USB Inserted!");
      break;
    case DFPlayerUSBRemoved:
      Serial.println("USB Removed!");
      break;
    case DFPlayerPlayFinished:
      Serial.print(F("Number:"));
      Serial.print(value);
      Serial.println(F(" Play Finished!"));
      break;
    case DFPlayerError:
      Serial.print(F("DFPlayerError:"));
      switch (value) {
        case Busy:
          Serial.println(F("Card not found"));
          break;
        case Sleeping:
          Serial.println(F("Sleeping"));
          break;
        case SerialWrongStack:
          Serial.println(F("Get Wrong Stack"));
          break;
        case CheckSumNotMatch:
          Serial.println(F("Check Sum Not Match"));
          break;
        case FileIndexOut:
          Serial.println(F("File Index Out of Bound"));
          break;
        case FileMismatch:
          Serial.println(F("Cannot Find File"));
          break;
        case Advertise:
          Serial.println(F("In Advertise"));
          break;
        default:
          break;
      }
      break;
    default:
      break;
  }

}
So, what do we do with all this new knowledge? How about this:


Pingback: RaylFX – Military Training Area
Pingback: RaylFX – Train Station