This module of the RaylFX system controls a military training area and offers some exciting action. It has a shooting range control on which six LEDs simulate muzzle flashes. An audio module provides the corresponding rifle bang. How often and how fast the shots are fired is randomly determined so that there is no chance of boredom.
For the friends of larger caliber there is the control for a tank. Here a stepper motor is used to e.g. align the tank turret to the target or to move the whole tank. The sequence has three phases: forward, backward, forward. After a short pause a shot is released. The firing sound is played from the sound module and an LED flashes acts as the muzzle flash. A blink of an eye later, the charge hits a bomb crater. Again, an LED flashes as an explosion, an solenoid hits the impact site from below and flings dirt upward. A red and a yellow LED simulate another small fire in the crater, then ghostly silence reigns over the scene again. The frequency of the two animations can easily be set in the configuration section in the code.
Components
- 1x Arduino Nano*
- 1x Breadboard and jumper wires*
- LEDs*
- Jumper wires* or ribbon jumper wires* to pull apart
- 1x Stepper motors and driver boards*
- 1x DFPlayer-Mini* MP3 player module
- 1x SD-card for the MP3 player module
- 1x Speaker*
- 10x 220 Ohm resistors
- 1x 1 kOhm resistor
- 1x Diode z.B. 1N4001*
- 1x Switching relay module* for solenoidcontrol
- 1x Solenoid with return spring*
- 1x Power supply for solenoid*
Wiring Diagram

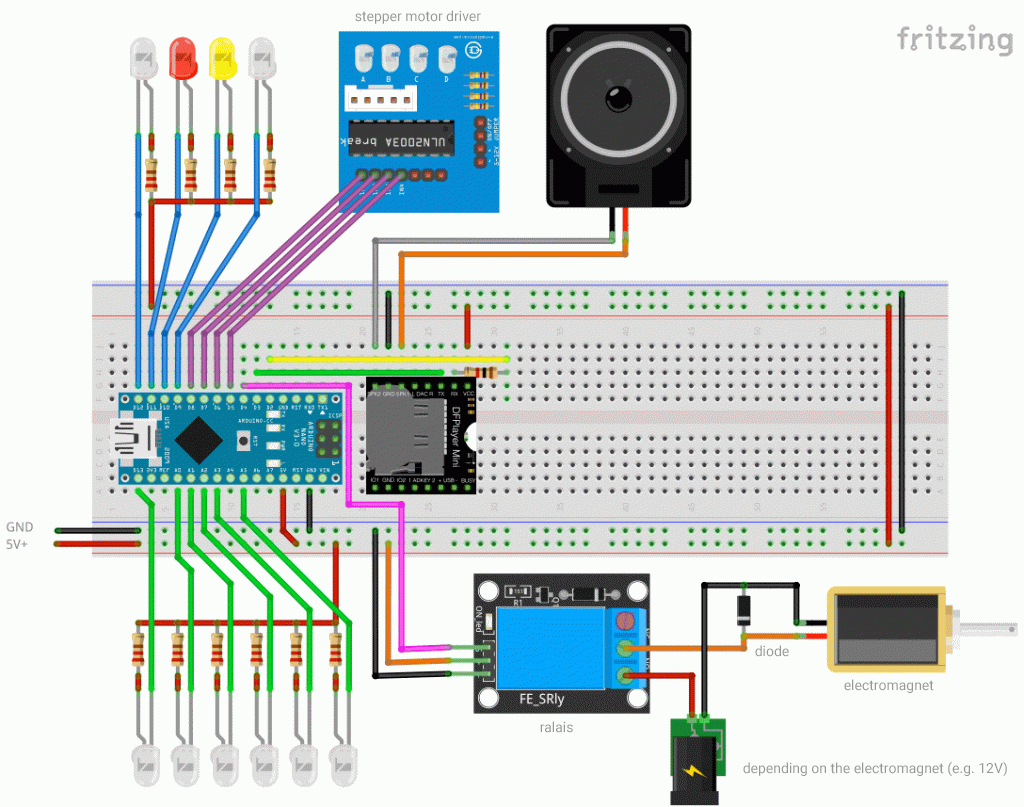
The circuit is based on the Arduino Nano board. The LEDs of the shooting range are connected to the cathode (short leg) at the Arduino pins 13, A0, A1, A2, A3 and A5. The anode (long leg) connects the LED to the 5V+ via a 220 Ohm resistor. Instead of the big 5mm LEDs you can of course also use SMD LEDs and enamelled wire.
For the stepper motor I’m using the 28BYJ-48 with the ULN2003 driver board. It is connected to the Arduino pins 5, 6, 7 and 8. The whole set should cost around three euros. The LED for the muzzle flash of the tank is connected to pin 12.
The solenoid for the bomb crater is operated with an external power supply unit that is triggered by the switching relay module. The voltage of the power supply must match the solenoid. A diode in the reverse direction intercepts the induced voltage that occurs when the solenoid is switched off.
The switching relay module is connected to 5V+, GND and the digital pin 4 of the Arduino board.
The explosion is visualized with the LED at pin 9 of the Arduino. It flashes on impact. Additionally, the LEDs at pins 10 and 11 simulate an afterburn in the bomb crater.
The animations are accompanied acoustically by the DF-Player module. It is connected to the Arduino with pins 2 and 3. Additionally it receives the supply voltage 5V+ and GND. The DF-Player plays MP3 files from a SD card. The card should be formatted in FAT-16 or FAT-32. The files must be stored on the SD card in the directory 001.
Further info about the DF-Player on this page: DFPlayer Mini-MP3-Player for Arduino.
Normally the control signal of the RaylFX control module is applied to pin A4. It controls the time of day, but is not required for this module.
Code Settings
The following settings can be made in the code:
- Likelihood of gun being fired
- Likelihood of tank firing
- Volume
- Number of guns at the shooting range
In the following part of the program you can adjust the above parameters:
int firingLikelihood = 10;                   // likelihood of rifle being fired
int tankfiringLikelihood = 20;               // likelihood of tank firing

int volume = 20;                             // volume of the DFPlayer (0 – 30);

int mp3Count = 6;                            // amount of MP3 files on the SD card
int mp3Duration[] = {2, 1, 1, 6, 5, 16};     // duration of MP3 files in seconds

int gunCount = 6;                            // number of guns at the shooting range
The military training area module uses the CheapStepper library. This library must be installed first. For this go in the Arduino menu to Sketch>Include Library>Manage Libraries … and search for CheapStepper in the search field. Install the current version of the CheapStepper library by Henry Tyler.
It also requires the DFRobotDFPlayerMini library by DFRobot. Install it as you did with the CheapStepper library.
When uploading you have to make sure that the correct board is selected in the Arduino menu. To do this, “ATmega328P (Old Bootlaoder)” must also be selected in the Processor subitem of the Tools menu.
The following program code can be easily copied with the above mentioned changes and loaded onto the Arduino nano.
Code for the RaylFX Military Training Area Module
  /*
     Rayl-FX Military Training Area Module
             Shooting Range / Gun Range

     StartHardware.org/en
*/

#include <CheapStepper.h>
#include "SoftwareSerial.h"                 // required for the DFPlayer
#include "DFRobotDFPlayerMini.h"            // required for the DFPlayer

/* ***** ***** Settings ***** ***** ***** *****  ***** ***** ***** *****  ***** ***** ***** ***** */

int firingLikelihood = 10;                  // likelihood of rifle being fired
int tankfiringLikelihood = 20;              // likelihood of tank firing

int volume = 20;                            // volume of the DFPlayer (0 – 30);

int mp3Count = 6;                           // amount of MP3 files on the SD card
int mp3Duration[] = {2, 1, 1, 6, 5, 16};    // duration of MP3 files in seconds

int gunCount = 6;                           // number of guns at the shooting range

/* ***** ***** From here begins the program code, which does not need to be adjusted ***** ***** ***** ***** */

int gunPins[6] = {13, 14, 15, 16, 17, 19};
int magnetPin = 4;                          // pin of the relay to which the solenoid is connected
int cannonPin = 12;
int impactPin = 9;
int fire1Pin = 10;
int fire2Pin = 11;

/* Timer Variablen */
long cooldown = 2000;                       // general waiting time in the loop

/* Create Objects */
SoftwareSerial mySoftwareSerial(3, 2);      // RX, TX for the DFPlayer
DFRobotDFPlayerMini myDFPlayer;             // DFPlayer object

CheapStepper stepper1 (5, 6, 7, 8);         // creating stepper motor object fur tank turret

void setup() {
  Serial.begin(115200);                     // starts the serial communication
  mySoftwareSerial.begin(9600);             // starts the serial communication for DFPlayer

  stepper1.setRpm(16);
  pinMode(magnetPin, OUTPUT);
  pinMode(cannonPin, OUTPUT);
  pinMode(impactPin, OUTPUT);

  for (int i = 0; i < 6; i++) {
    pinMode(gunPins[i], OUTPUT);
    digitalWrite(gunPins[i], HIGH);
  }

  digitalWrite(cannonPin, HIGH);
  digitalWrite(impactPin, HIGH);

  /* DFPlayer Setup */
  Serial.println(F("Initializing DFPlayer ... "));
  if (!myDFPlayer.begin(mySoftwareSerial)) {  // use softwareSerial to communicate with DFPlayer
    Serial.println(F("Error: Check connection to DFPlayer and SD-card"));
  }
  Serial.println(F("DFPlayer Mini online."));
  myDFPlayer.volume(volume);                  // volume is assigned
}

void loop() {
  if (random(firingLikelihood)<2) shootingRange();
  if (random(tankfiringLikelihood)<2) tankShot();
  delay(cooldown);
}

void shootingRange() {
  // gun firing order on the shooting range
  int theRepeations = random(30);
  for (int i = 0; i < theRepeations; i++) {
    myDFPlayer.playFolder(1, 3);
    int theGun = random(gunCount);
    delay(100);
    digitalWrite(gunPins[theGun], LOW);
    delay(50);
    digitalWrite(gunPins[theGun], HIGH);
    delay(random(1000));
  }
}

void tankShot() {
  // firing order for the cannon

  myDFPlayer.playFolder(1, 4);

  for (int i = 0; i <= 1000; i++) {
    stepper1.run();
    stepper1.newMoveDegrees (true, 1);
    delay(1);
  }

  for (int i = 0; i <= 1200; i++) {
    stepper1.run();
    stepper1.newMoveDegrees (false, 1);
    delay(1);
  }

  for (int i = 0; i <= 200; i++) {
    stepper1.run();
    stepper1.newMoveDegrees (true, 1);
    delay(1);
  }

  delay(2000);
  myDFPlayer.playFolder(1, 1);
  delay(50);
  digitalWrite(cannonPin, LOW);
  delay(20);
  digitalWrite(cannonPin, HIGH);
  delay(1500);
  myDFPlayer.playFolder(1, 2);
  delay(50);
  digitalWrite(impactPin, LOW);
  delay(30);
  digitalWrite(impactPin, HIGH);
  delay(50);
  digitalWrite(magnetPin, HIGH);
  digitalWrite(impactPin, LOW);
  delay(100);
  digitalWrite(magnetPin, LOW);
  digitalWrite(impactPin, HIGH);
  for (int i = 0; i < 5; i++) {
    analogWrite(fire1Pin, 125 + random(125));
    analogWrite(fire2Pin, 125 + random(125));
    delay(random(500) + 50);
  }
  for (int i = 0; i < 5; i++) {
    analogWrite(fire2Pin, 125 + random(125));
    delay(random(500) + 50);
  }
  analogWrite(fire1Pin, 255);
  analogWrite(fire2Pin, 255);
}

void printDetail(uint8_t type, int value) {     // DF Player error code
  switch (type) {
    case TimeOut:
      Serial.println(F("Time Out!"));
      break;
    case WrongStack:
      Serial.println(F("Stack Wrong!"));
      break;
    case DFPlayerCardInserted:
      Serial.println(F("Card Inserted!"));
      break;
    case DFPlayerCardRemoved:
      Serial.println(F("Card Removed!"));
      break;
    case DFPlayerCardOnline:
      Serial.println(F("Card Online!"));
      break;
    case DFPlayerUSBInserted:
      Serial.println("USB Inserted!");
      break;
    case DFPlayerUSBRemoved:
      Serial.println("USB Removed!");
      break;
    case DFPlayerPlayFinished:
      Serial.print(F("Number:"));
      Serial.print(value);
      Serial.println(F(" Play Finished!"));
      break;
    case DFPlayerError:
      Serial.print(F("DFPlayerError:"));
      switch (value) {
        case Busy:
          Serial.println(F("Card not found"));
          break;
        case Sleeping:
          Serial.println(F("Sleeping"));
          break;
        case SerialWrongStack:
          Serial.println(F("Get Wrong Stack"));
          break;
        case CheckSumNotMatch:
          Serial.println(F("Check Sum Not Match"));
          break;
        case FileIndexOut:
          Serial.println(F("File Index Out of Bound"));
          break;
        case FileMismatch:
          Serial.println(F("Cannot Find File"));
          break;
        case Advertise:
          Serial.println(F("In Advertise"));
          break;
        default:
          break;
      }
      break;
    default:
      break;
  }
}
 We need your consent to load the content of YouTube.