An LCD display, or liquid crystal display, is based on so-called liquid crystals, which change their polarization direction when an electrical voltage is applied. They become opaque.
Of course, the D in LCD stands for display, but people still call it LCD display and I do the same here. I hope it does not bother too much.
In the LCD display these liquid crystals are arranged in segments and can independently change the transparency. You can find it applied in digital wristwatches, printer displays, thermometers or in cars.
There are LCD displays in different shapes and with all sorts of different segment arrangements, eg. as a pixel grid, as a seven-segment-display or as an alpha-numeric display.
In the Arduino area multi-line alphanumeric LCD displays with 16 pin connector are popular. They are often based on the HD44780 chip from Hitachi and are addressed with the Arduino library LiquidCrystal. They are relatively easy to connect and easy to program.
Sources
Arduino LCD Display Circuit
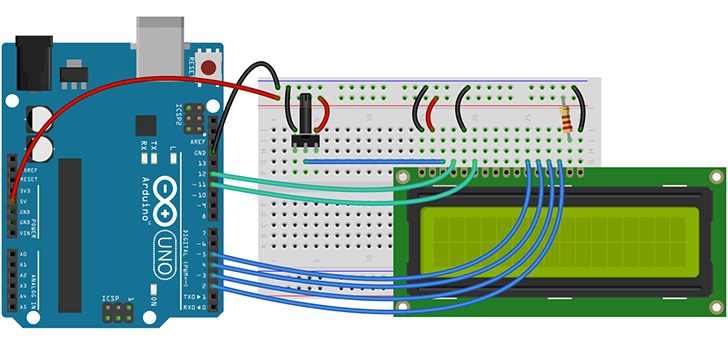
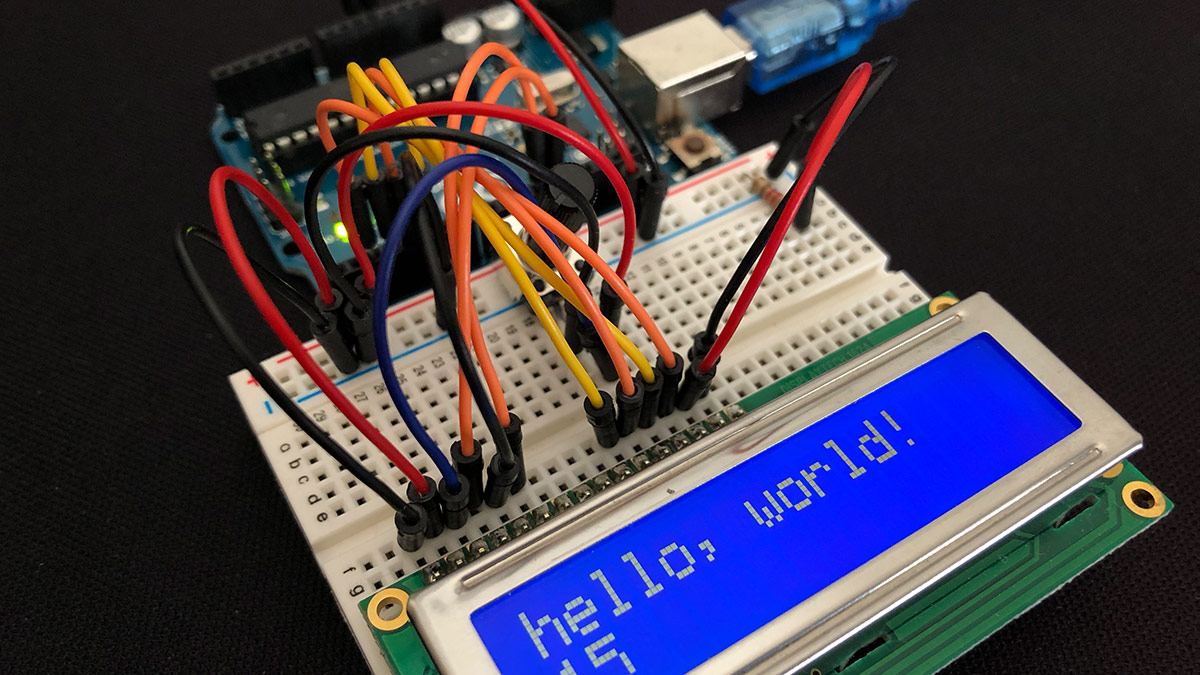
Such an LCD display can be addressed in 4 or 8 bit mode. In 4-bit mode you need 4, in 8-bit mode 8 data cables from just as many digital pins of the Arduino board. It is connected as shown in the diagram.
Depending on the type of display, there is a backlight connector and a potentiometer to control the display contrast.
LCD display program code
In the program, the library, which incidentally comes with the Arduino software, is included:
#include <LiquidCrystal.h>
Now the LiquidCrystal object with the name lcd is created. The digital output pins that were used are given as parameters:
const int rs = 12, en = 11, d4 = 5, d5 = 4, d6 = 3, d7 = 2;Liquid Crystal lcd (rs, en, d4, d5, d6, d7);
The display configuration is transferred in the setup. The two parameters represent the number of characters in a line and the number of lines. In this example, 16 characters and 2 lines:
lcd.begin (16, 2);
With print you can write messages on the display.
lcd.print ("hello, world!");
If you want to write something to a certain position, you have to move the cursor first. Here on the first character of the second line (it is counted from 0). The example outputs the current milliseconds / 1000. So there are seconds since turning on:
lcd.setCursor (0, 1);lcd.print (millis () / 1000);
The entire code of the Arduino example (by D. Mellis and T. Igoe) found under File> Samples> LiquidCrystal> HelloWorld looks like this:
#include <LiquidCrystal.h>

const int rs = 12, en = 11, d4 = 5, d5 = 4, d6 = 3, d7 = 2;
LiquidCrystal lcd(rs, en, d4, d5, d6, d7);

void setup() {
  lcd.begin(16, 2);
  lcd.print("hello, world!");
}

void loop() {
  lcd.setCursor(0, 1);
  lcd.print(millis() / 1000);
}
LCD display with I2C control
There is another option to run an LCD display with even fewer pins. They have an additional controller and can be easily controlled via the I2C interface from the Arduino. (I2C is a data connection that provides control signals between various electronic components.) A look is definitely worth it.
