You are looking for a Arduino programming guide? Easy to understand, hands-on and free? Then you are exactly right here at the Arduino programming course. This basic course is aimed at beginners. For all program examples you only need one circuit.
Tutorial structure
- Program commands
- Program structure
- Variables
- if Statement
- for Statement
- Methods
Circuit for this tutorial
As preparation please build up the following circuit:
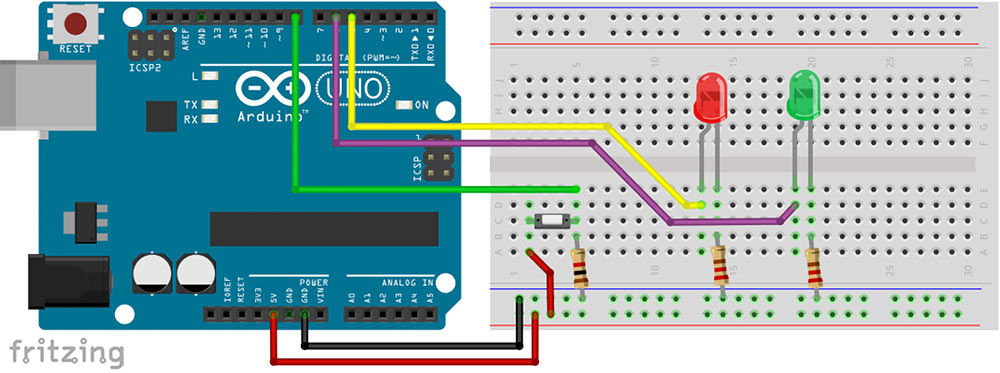
Now you have a button at the digital pin 8, a red LED at the digital pin 5 and a green one at the digital pin 6.
What is an Arduino program?
A program consists of commands. They are executed in order they are written in so from top to bottom.
What is a command?
Commands are program statements that trigger certain functions. The command:
pinMode(6,OUTPUT);sets the digital pin 6 as an output. With the command:
digitalWrite(6, HIGH);A Voltage (5V+) is switched to the digital pin 6. So you could say, it is switched on. The command:
digitalWrite(6, LOW);switches the Pin off. (Technically, it connects the Pin with GND – the minus pole.)
Every command must end with a semicolon! We’ll try it out right away. Upload the following program to the Arduino. (If you don’t know how, please read the Arduino Tutorial).
void setup() {
  pinMode(6, OUTPUT);
}

void loop() {
  digitalWrite(6, HIGH);
}
The green LED lights up.
Program Structure
An Arduino program has a specific program structure. In the simplest case, these are the two main methods, setup() and loop(). Everything written in the curly brackets {} belongs to the respective method.
void setup() {

}

void loop() {

}
While the setup() method runs only at program startup, the loop() method is repeated continuously. Download the following program on the Arduino:
void setup() {
  pinMode(6, OUTPUT);
}

void loop() {
  digitalWrite(6, HIGH);
  delay(1000);
  digitalWrite(6, LOW);
  delay(1000);
}
The command delay(1000) stops the program for a short time. The number in the parentheses indicates how long the program should be stopped. Here it is 1000 milliseconds, so one second. Such values transmitted with commands are called arguments. The command delay(1000) gets 1000 as an argument, digitalWrite (6, HIGH) gets even two arguments: 6 and HIGH.
Variables for Arduino programming
Now we have entered a 6 in our program in three different places. If we wanted to light the red LED instead of the green one, we would have to change that in three places. That is not very comfortable. It is better to store the information about the pin number in a variable. A variable is a small space of memory into which information of a particular format fits. The format is determined by the so-called variable type.
| Type | Meaning | Description |
| int | Integer | Numbers from -32,768 to 32,767 |
| long | Integer | Numbers from -2,147,483,648 to 2,147,483,647 |
| float | Floating point | Decimal numbers |
| char | Character | Alphanumeric characters (letters, numbers, special characters) |
The pin number is an integer. With the instruction:
int ledPin=6;you create a variable of the type int. It’s called ledPin and gets a value of 6. Wherever we now specify the variable name, it is replaced by the variables value.
int ledPin=6;

void setup() {
  pinMode(ledPin, OUTPUT);
}

void loop() {
  digitalWrite(ledPin, HIGH);
  delay(1000);
  digitalWrite(ledPin, LOW);
  delay(1000);
}
Now you can quickly write a program that makes the other LED flash by only changing one single number.
int ledPin=5;

void setup() {
  pinMode(ledPin, OUTPUT);
}

void loop() {
  digitalWrite(ledPin, HIGH);
  delay(1000);
  digitalWrite(ledPin, LOW);
  delay(1000);
}
if Statement
To read a button, you can use the command digitalRead(). It returns a value that can be read and compared. For comparison, the if statement can be used:
int ledPin=5;
int buttonPin=8;

void setup() {
  pinMode(buttonPin, INPUT);
  pinMode(ledPin, OUTPUT);
}

void loop() {
  if (digitalRead(buttonPin)==HIGH){
    digitalWrite(ledPin, HIGH);
  } else {
    digitalWrite(ledPin, LOW);
  }
}
In order to use the digitalRead() command the corresponding pin must first have been declared as an INPUT: pinMode(buttonPin, INPUT);
The construction if (digitalRead (buttonPin) == HIGH) checks whether the read-out state of the button is HIGH. In our example circuit, HIGH is output if the pin somehow has a connection to the 5V +. If the button is pressed, it has. The double equal sign == is mandatory! If the condition in the parentheses of the if statement is correct, it is called true. The code in the curly brackets is executed. If it is not true, the part in the brackets of the else construction is executed.
for Statement
Sometimes you want to repeat certain operations a few times. Therefore the for statement is suitable for this:
int greenPin=6;
int redPin=5;
int buttonPin=8;

void setup() {
  pinMode(greenPin, OUTPUT);
  pinMode(redPin, OUTPUT);
}

void loop() {
  for (int i=0; i<3; i=i+1){
    digitalWrite(greenPin, HIGH);
    delay(250);
    digitalWrite(greenPin, LOW);
    delay(250);
  }

  for (int i=0; i<6; i=i+1){
    digitalWrite(redPin, HIGH);
    delay(250);
    digitalWrite(redPin, LOW);
    delay(250);
  }
}
This program will first blink the green LED three times, then the red six times. The construction for (int i = 0; i <3; i = i + 1) {} repeats everything in the curly brackets as long as the continuation condition i < 3 is true — i is a counter variable that is created at startup and set to 0 (int i = 0). For each loop iterative i is incremented by 1: i = i + 1. (Normally this is shortened by the phrase i++).
Methods (or functions)
This program text still is relatively long and can be shortened by creating your own method. Whenever you want to repeat the same command sequences, this is useful:
int greenPin=6;
int redPin=5;
int buttonPin=8;

void setup() {
  pinMode(greenPin, OUTPUT);
  pinMode(redPin, OUTPUT);
}

void blinken(int thePin, int wiederholungen){
  for (int i=0; i<wiederholungen; i=i+1){
    digitalWrite(thePin, HIGH);
    delay(250);
    digitalWrite(thePin, LOW);
    delay(250);
  }
}

void loop() {
  blinken(greenPin,3);
  blinken(redPin,6);
}
The method void blink(){ } causes an LED to flash a certain number of times. It needs two pieces of information: Which LED should blink? How often should she flash? Both information is an integer and will flash as arguments in the parentheses (int thePin, int repetitions). Within the method you can now use the variables thePin and repetitions.
From the loop() method, we call the blink() method twice, passing in each case the LED and the number of iterations.
blinken(greenPin,3);
blinken(redPin,6);
Congratulations! You reached the end of this quick start guide. I hope it was clear enough. Now, you know the basics and there is not much more to learn for now. Jump into interesting projects, copy and past code and modify. This is what even the best programmers do. And if you want to see more of the Arduino commands check out their reference. All the best and thanks for reading 🙂
