With Arduino WS2812 LEDs are controlled in a very easy way. They are addressable RGB LEDs with a built-in chip and therefore occupy only a single digital output of the Arduino board. They are even available as RGBW (red-green-blue-white).
If you want to control LEDs with Arduino, then you quickly reach the limits of the available channels. Straight RGB LEDs each require three valuable analogue channels (red, green, blue).
The WS2812 LEDs provide an elegant solution. They have a built-in controller. A data signal from the Arduino board then determines in which color the controller should light which LED. In addition, many WS2812 LEDs can be connected in series.
Where can I get it?
There is a bunch of cool options. You can get the LEDs as stripes, rings, single dots or on a chain.
WS2812 LED in detail

Each LED with WS2812 controller has four ports. 5V +, GND, DI and DO. DI stands for Data In, DO stands for Data Out. There are different WS2812 strips and LEDs. The assignment of the connections may vary.
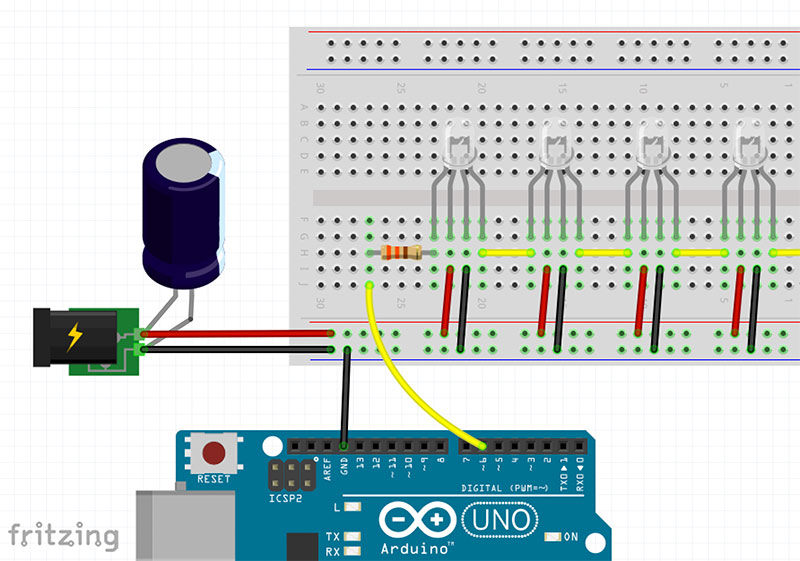
WS2812 Circuit

First, let’s take a look at the power supply. Each WS2812 LED needs up to 60mA. It is therefore advisable to use a power adapter. This power supply should be supported with an big electrolytic capacitor (1000uF, 6.3V). The GND of the power supply and the GND of the Arduino must be connected.
Now you can simply connect a digital channel of the Arduino-Board via a resistor (300 – 500 ohms) with the Din of the first LED. Inside the LED strip the Dout of the first LED is connected to the Din of the next LED, and so on. The resistor is only needed at the first LED. It hast to be as close as possible to the first LED. If you forget the resistor it may break your LED strip!
Arduino WS2812 Functionality

Color information is transmitted in a sequence via a digital Pin of the Arduino. The first LED takes the first color value and lights up accordingly. The remaining information is transferred via the Dout pin to the next LED and so on.
Code
We simply use Adafruit’s NeoPixel library. In the Arduino Software (IDE) click on Sketch > Include Library > Manage Libraries and search for NeoPixel in the search field. Install the current version of the Adafruit NeoPixel library by Adafruit. Now, you will find the following code example under File> Examples> Adafruit NeoPixel> simple.
#include
#include <avr/power.h>

#define PIN            6
#define NUMPIXELS      10

Adafruit_NeoPixel pixels = Adafruit_NeoPixel(NUMPIXELS, PIN, NEO_GRB + NEO_KHZ800);

int delayval = 500;

void setup() {
  pixels.begin();
}

void loop() {
  for(int i=0;i<NUMPIXELS;i++){
    pixels.setPixelColor(i, pixels.Color(255,255,255)); // Moderately bright green color.
    pixels.show(); // This sends the updated pixel color to the hardware.
    delay(delayval); // Delay for a period of time (in milliseconds).
  }
}
Now you can just set NUMPIXELS to the amount of LEDs you want to use:
pixels.setPixelColor(ledNumber, pixels.Color(255,255,255)); // Moderately bright green color.Now you can apply any desired color (pixels.Color (255,255,255)) to each LED (ledNumber – position of the LED in the row). I recommend to look at the example> strandtest. In this example you will find some cool animation sequences already created.
5mm WS2812 LEDs
The WS2812 LEDs are available as 5mm versions as well. I’m a big fan of 5mm LEDs since they look very classy so I recomment to play around with it.
If you have any further questions, please write’em in the comments! Have fun with Arduino and the addressable LEDs 🙂
Inspiration
And what can you do with this brand new knowledge? What about …


Hey, could you help me to write a code in arduino. I need to control ws2812 led with arduino joystick. X axis – colour of led, Y axis – brightness, joystick click – lock/unlock
Just read FastLED examples carefully. EVERY of them has brightness and colour set up somewhere, it’s not that hard.
The rest is Your particular code. You might be get freezed somewhere, and cannot move on from that point. This is kind of often beginners mistake, regarding all arduino coding (or having a dead code fragment). We probably won’t help more than google with nothing to work with
Is there a maximum number of LEDs that can be controlled with an arduino? I am looking to controling 2880 LEDs with an arduino and an external power supply.
Hm, I know that there is the OctoBoard for Teensy what is capable of driving thousands of LEDs. I hope that helps 🙂
Pingback: Arduino Valentine's Day Project: Romantic Wall Light - StartHardware - Tutorials for Arduino