In this project I show you how to build a Halloween candy dispenser with creepy factor with Arduino.
What is a Halloween candy dispenser?
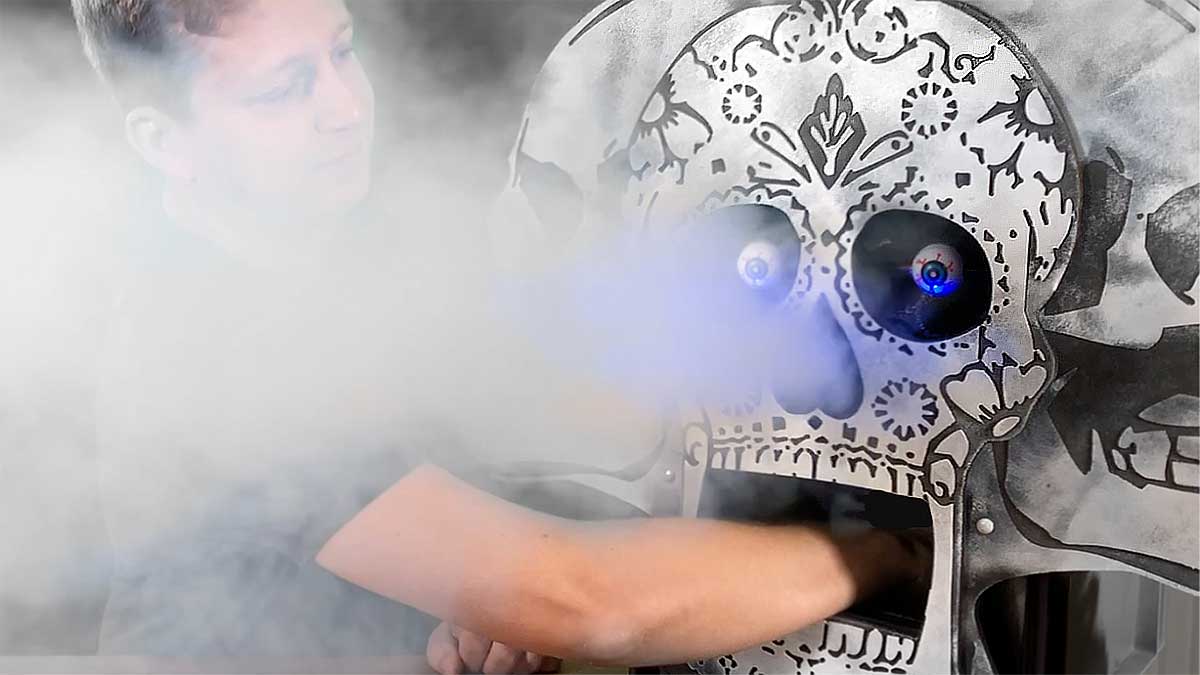
It’s Halloween and colorfully dressed ghosts are at the door. Usually someone comes out with a bowl of candy and the ghosts take their loot. But not this year! Instead of a bowl, visitors have to reach into the mouth of a creepy skull to get the rewards. But the skull opens its eyes and sprays creepy fog from its nose.
Please also pay attention to my Corona hint at the end of this article.

Components for electronics
- Arduino Set, Breadboard, Cable, etc.*
- 2x servo motor*
- 1x fog machine*
- 1x IR sensor*
Functionality
If someone puts his hand into the mouth of the skull, it is registered by an infrared sensor. The eye sockets light up and the eyeballs turn forward. After a short time, a burst of fog sprays from the skull’s nose. When the hand is pulled out again, the eyes turn back again and the light switches off.
Halloween candy dispenser setup
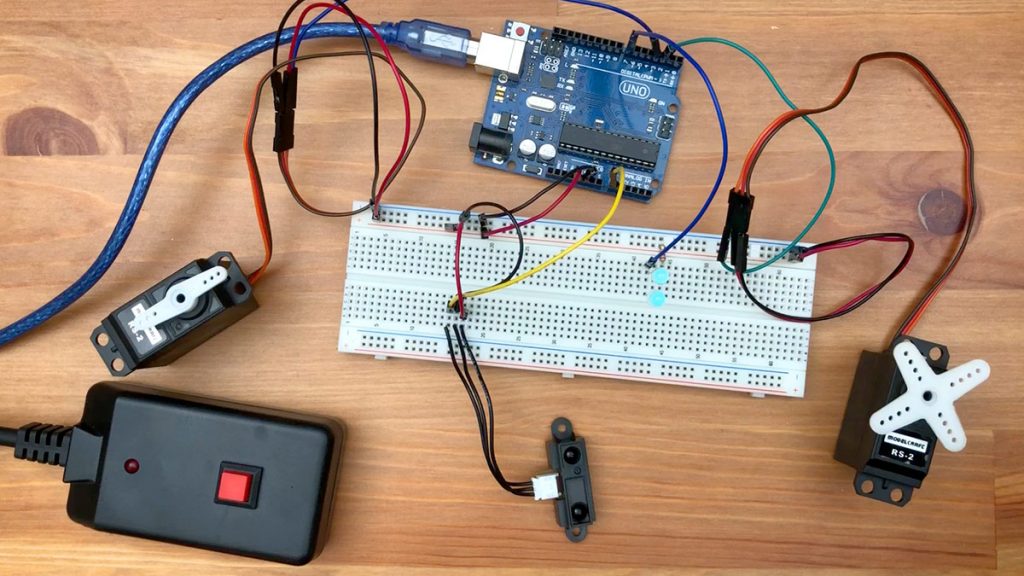
Let’s start with the electronics. The project consists of two LEDs for lighting and a servo (More information about the servo motor) for the movement of the eyes, a fog machine that is switched on by the servo motor and an IR sensor that detects movement in the skull’s mouth.
Trigger fog
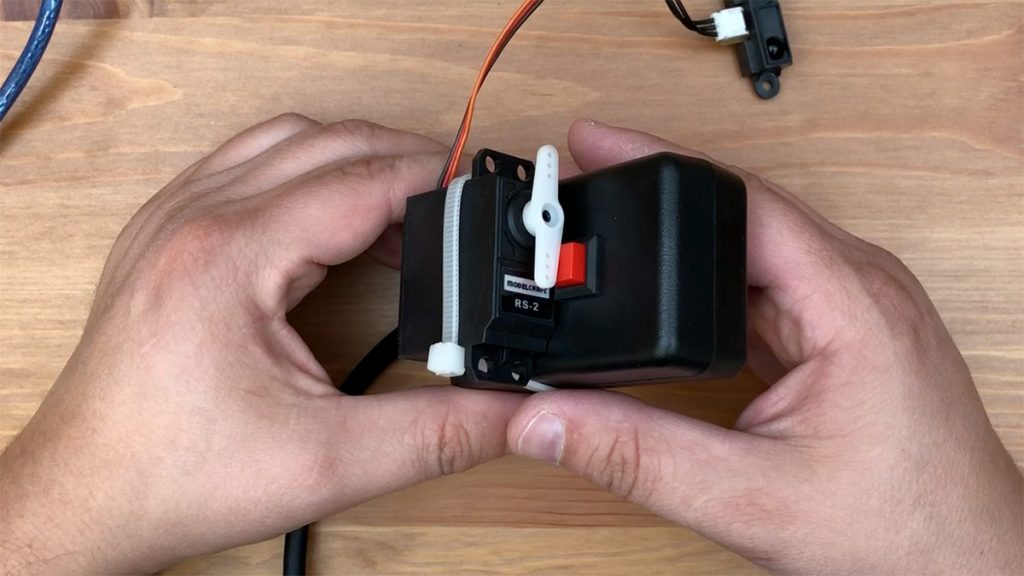
A fog machine is an exciting device and I don’t want to destroy it for this project by cutting off cables somewhere. My alternative is a servo motor fixed to the release button with hot glue and a cable tie. If the servo is turned, it pushes the trigger down and the fog machine starts. If the servo is turned back, the machine stops again. But only assemble it after you have tested the code. The angle of rotation of the servos must fit to your setup.
Circuit
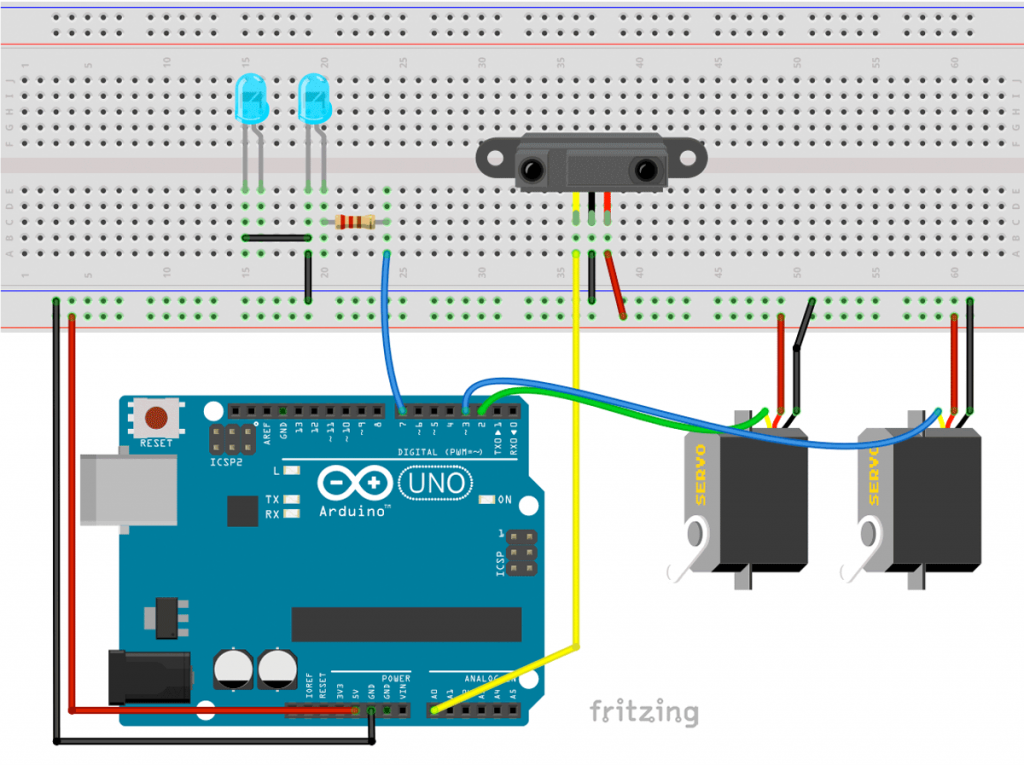
The circuit consists of two LEDs connected to GND on the cathode side (short legs) and to digital pin 7 of the Arduino on the anode side (long leg) via a 220 Ohm resistor. Two servo motors are connected to 5V+ and the GND. They receive their control signals via digital pins 2 and 3. The infrared sensor is also connected to 5V+ and the GND. It sends an analog signal to the analog input pin A0.
Code for the Halloween candy dispenser
To understand how the code works, let’s look at the loop of the candy dispenser code.
void loop() {
  Serial.println(analogRead(irPin));
  if (analogRead(irPin) > irThreshold) {
    eyesOn();
    if ((fogTimer+fogTimeout<millis())&&(fogDone==false)){
        fog();
        fogDone=true;
    }
  } else {
    eyesOff();
    fogTimer = millis();
    fogDone = false;
  }
  delay(10);
}
Through the if-query, the program waits until the IR sensor reports that someone has put his hand in the mouth. The switching limit (irThreshold) must still be set for this. Just test it out. In the Serial Monitor (baud rate 115200) you can display the values.
So if the IR sensor is triggered, the method eyesOn() is called. It turns on the LEDs and turns the eyes forward.
Now it is checked if the variable nebulaTimer plus the time the fog should spray (fogTimeout) has expired and if fog has been emitted before. If both are not the case, fog is released.
If there is no hand in the mouth, the method eyesOff() is called. It turns the eyes backwards and switches off the LEDs. At the same time it resets the fogTimer and sets the variable fogDone to false.
#include <Servo.h>

int ledPin = 7;
int servoEyesPin = 2;
int servoFogPin = 3;
int irPin = A0;
int irThreshold = 300;    // threshold when a hand is close to the sensor

long fogTimer = 0;
int fogTimeout = 2000;    // time until fog shall apear

boolean fogDone = false;

Servo myServoEyes, myServoFog;

void fog() {
    delay(random(1000));
    myServoFog.write(15);
    delay(300);
    myServoFog.write(0);
}

void eyesOn() {
  if (millis()%4000<10){
    digitalWrite(ledPin, LOW);
    delay(100);
    digitalWrite(ledPin, HIGH);
    }
  digitalWrite(ledPin, HIGH);
  myServoEyes.write(180);
}

void eyesOff() {
  digitalWrite(ledPin, LOW);
  myServoEyes.write(0);
}

void setup() {
  Serial.begin(115200);
  myServoEyes.attach(servoEyesPin);
  myServoFog.attach(servoFogPin);
  pinMode(ledPin, OUTPUT);
  myServoFog.write(0);
  myServoEyes.write(0);
}

void loop() {
  Serial.println(analogRead(irPin));
  if (analogRead(irPin) > irThreshold) {
    eyesOn();
    if ((fogTimer+fogTimeout<millis())&&(fogDone==false)){
        fog();
        fogDone=true;
    }
  } else {
    eyesOff();
    fogTimer = millis();
    fogDone = false;
  }
  delay(10);
}
Structure of the project
I am very lucky to own a CNC machine. It is the Shapeoko MAX and I got it from https://myhobby-cnc.de. However, an jigsaw and some creativity is enough for the project. The layout files I have made available on Github (https://github.com/StefanHermannBerlin/Arduino-Halloween-2018).

I milled out the reliefs and then painted everything black. Then I went over the surface with a varnishing roller and white varnish. This created a spotty effect, which I found quite nice.
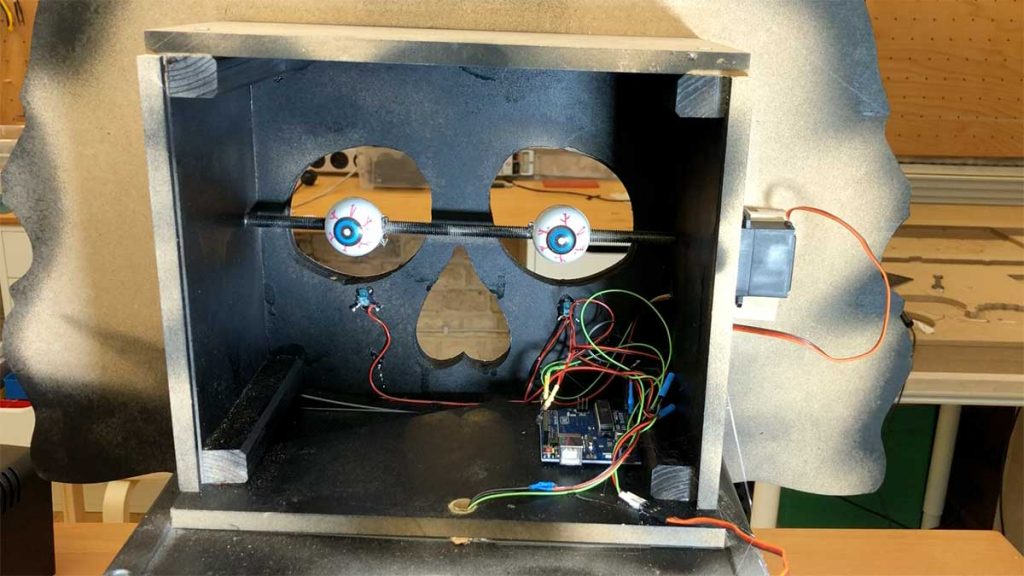
On the picture below you can see the structure. I got the eyes from the baking department in our supermarket, but a few painted table tennis balls are at least as good. The eyes are mounted on a M8 shaft. I glued a M8 nut to the axle of the servo with hot glue and it works pretty good. The two LEDs are glued under the eyes. They illuminate the eyes from below, which looks extra scary.
The IR sensor is mounted in a plastic box directly above the upper teeth of the skull, looking down.
I sawed the plastic box open at the back to put sweets in. It is screwed to the skull and offers stability for the assembly. On top of it is the fog machine, which blows fog through a hole in the back of the upper box through nose and eye sockets. (By the way, the white powerbank on top of the box in the picture is just for testing purposes).
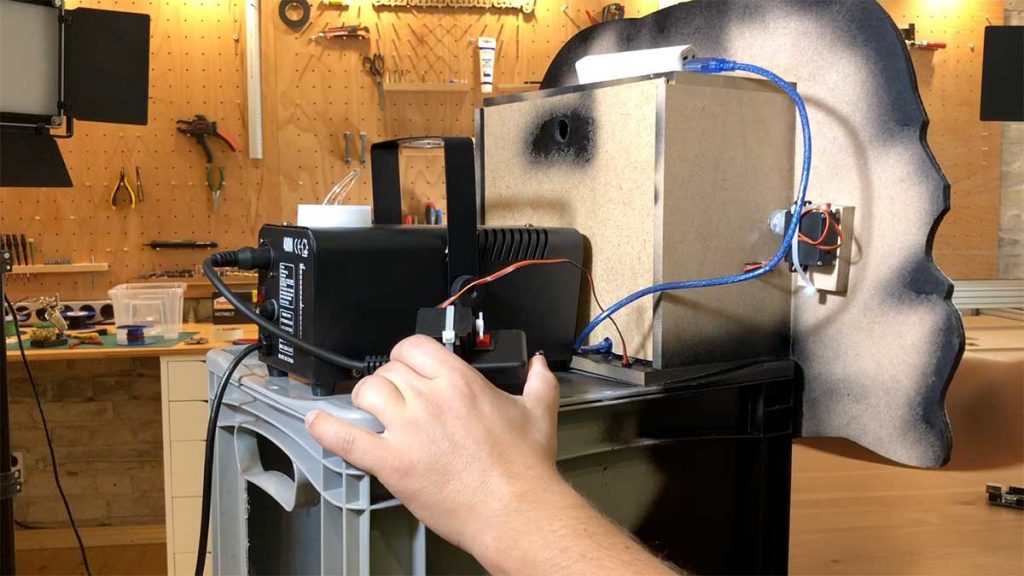
Attention! You should definitely test if the fog from your machine is too hot and if someone could be injured. With my fog machine the fog is rather cold.
Project as video
By the way, the project is also available as video. It is in German but good to see the steps of the build 🙂
Corona note
This year everything is a bit crazy and I don’t know if we will see any Halloween visitors at all. But in order not to endanger them, I recommend – no, I’m not a virologist – to spray the box with disinfectant after each group of visitors and put a clean bowl of new candy in it. On the other hand, the Halloween candy dispenser at least doesn’t get you too close to other people.
I hope you have as much fun with the build as I did and finally a reason to get yourself a fog machine. If you have any questions, feel free to ask in the comments here.
