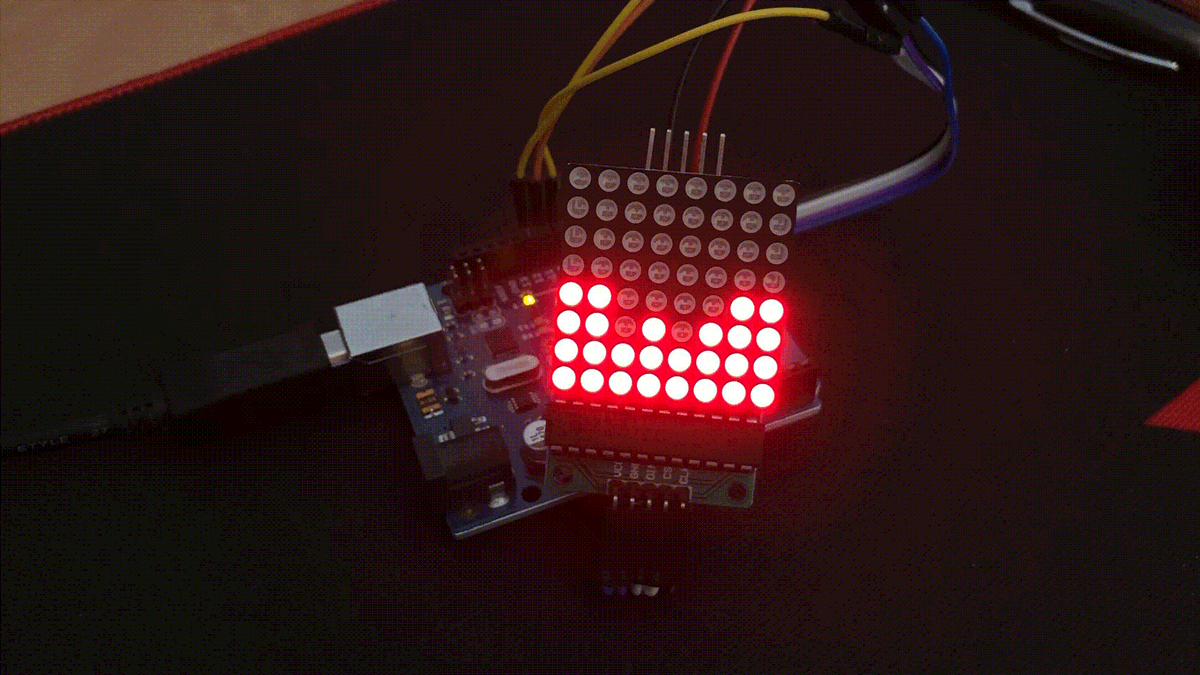
Der Winter ist da. Höchste Zeit, sich ein paar warme Gedanken zu machen und ein Kaminfeuer auf einer LED-Matrix.
Bauteile
Für dieses Projekt brauchst du:
Schaltplan
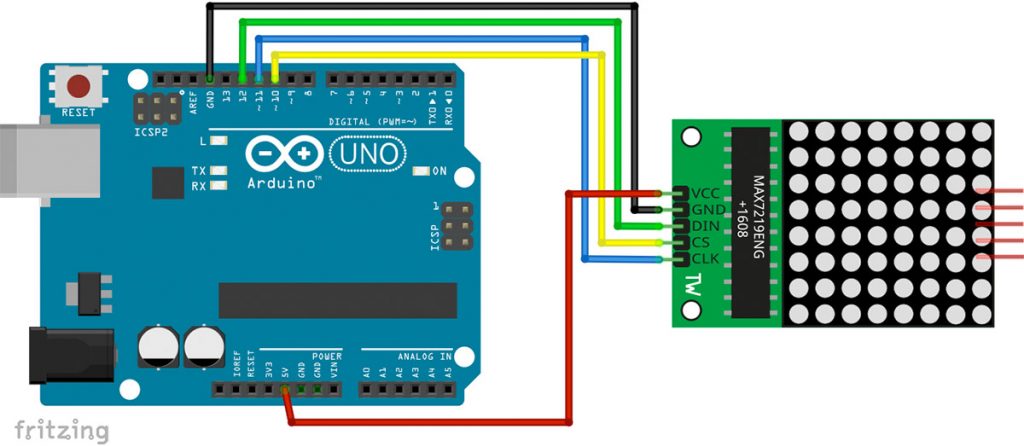
Die LED-Matrix wird direkt an das Arduino angeschlossen. Dazu benötigt man drei digitale Pins für die SPI-Kommunikation und zwei Kabel für die Stromversorgung (GND und 5V+).
Mehr Informationen zur Funktionsweise der LED-Matrix findest du in der Sektion Tutorials: Arduino Matrix Display 8×8 Pixel und jede Menge Spaß.
Code
Hier ist der Programm-Code. Die Leuchthöhe der einzelnen Reihen wird festgelegt.
if (int(random(1)) == 0) {
  for (int x = 0; x < 8; x++) {
    theHeightTarget[x] = int(random(5)) + 1;
  }
}
Dann versucht das Programm, die aktuelle Leuchthöhe anzupassen.
// update
for (int x = 0; x < 8; x++) {
  if (theHeightTarget[x] > theHeightCurrent[x])theHeightCurrent[x]++;
  if (theHeightTarget[x] < theHeightCurrent[x])theHeightCurrent[x]--;
}
Das wird dann auf der Matrix dargestellt:
// show display
for (int x = 0; x < 8; x++) {
  for (int y = 0; y < theHeightCurrent[x]; y++) {
    lc.setLed(0, x, y, 1);
  }
  for (int y = theHeightCurrent[x]; y < 8; y++) {
    lc.setLed(0, x, y, 0);
  }
}
Ab und zu löst sich ein Funke und fliegt nach oben.
// spark – Funkenflug
sparkX = int(random(8));
if (int(random(40)) == 0) {
  for (int y = 4; y < 8; y++) {
    if (y == 4) {
      lc.setLed(0, sparkX, y, 1);
    } else {
      lc.setLed(0, sparkX, y, 1);
      lc.setLed(0, sparkX, y - 1, 0);
    }
  delay(25);
  }
} else {
  delay(100);
}
Hier ist der Code im Gesamten:
#include "LedControl.h"
LedControl lc = LedControl(12, 11, 10, 1);

int theHeightTarget[8];
int theHeightCurrent[8];

int fireHeight = 0;
int sparkX = 0;

void setup() {
  lc.shutdown(0, false);
  lc.setIntensity(0, 8);
  lc.clearDisplay(0);
  Serial.begin(115200);
}

void loop() {
  //lc.clearDisplay(0);
  // set Heights
  if (int(random(1)) == 0) {
    for (int x = 0; x < 8; x++) {
      theHeightTarget[x] = int(random(5)) + 1;
    }
  }

  // update
  for (int x = 0; x < 8; x++) {
    if (theHeightTarget[x] > theHeightCurrent[x])theHeightCurrent[x]++;
    if (theHeightTarget[x] < theHeightCurrent[x])theHeightCurrent[x]--;
  }

  // show display
  for (int x = 0; x < 8; x++) {
    for (int y = 0; y < theHeightCurrent[x]; y++) {
      lc.setLed(0, x, y, 1);
    }
    for (int y = theHeightCurrent[x]; y < 8; y++) {
      lc.setLed(0, x, y, 0);
    }
  }

  // spark – Funkenflug
  sparkX = int(random(8));
  if (int(random(40)) == 0) {
    for (int y = 4; y < 8; y++) {
      if (y == 4) {
        lc.setLed(0, sparkX, y, 1);
      } else {
        lc.setLed(0, sparkX, y, 1);
        lc.setLed(0, sparkX, y - 1, 0);
      }
      delay(25);
    }
  } else {
    delay(100);
  }
}
Wenn dir das Projekt gefallen hat und du von weiteren interessanten Projekten inspiriert werden willst, sieh dir doch mal mein neues E-Book »Arduino Projekte Volume 1« an!
- Die beliebtesten Arduino-Projekte von StartHardware
- Inklusive Schaltplan, Beschreibung und Code
- Arduino-Schnellstart-Kapitel
- Kompakter Programmierkurs