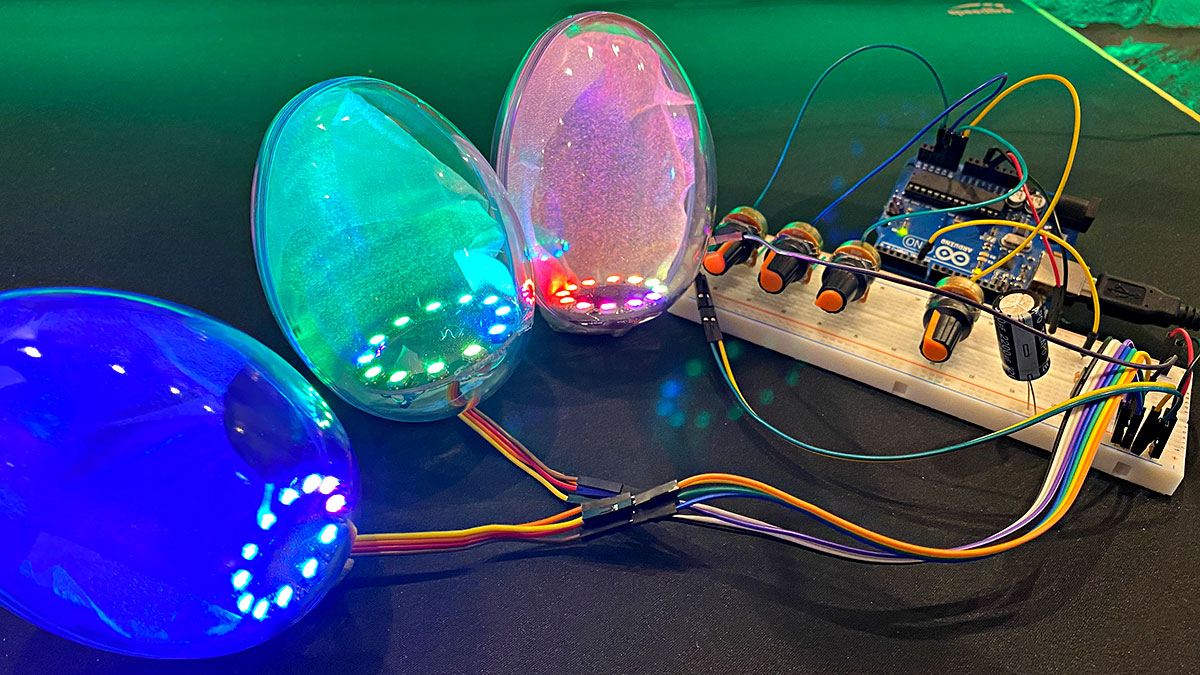
Bald ist es wieder so weit. Fleißige Osterhasen hoppeln durch die Wohnung und den Garten und verstecken allerlei ovale Überraschungen. Natürlich können diese emsigen Tiere nicht alles alleine machen und so könnten wir ihnen mit ein paar bunt leuchtenden RGB-Ostereiern unter die Arme (Pfoten?) greifen.
Leuchtende Ostereier mit Arduino bestehen aus WS2812 LED-Ringen. Ihre Farben lassen sich über Potentiometer einstellen. Darüber hinaus können unterschiedliche Animationen auf den LEDs dargestellt werden. Ein lustiges Projekt für die ganze Familie – und den Osterhasen :-D
Bauteile
- 1x
- 1x 220 Ohm Widerstand
- 3x WS2812 RGB-LED-Ring
- 3x Potentiometer
- 1x Elektrolyt-Kondensator (zwischen 100µF und 1000µF)
- 3x Acryl-Eier
Schaltung
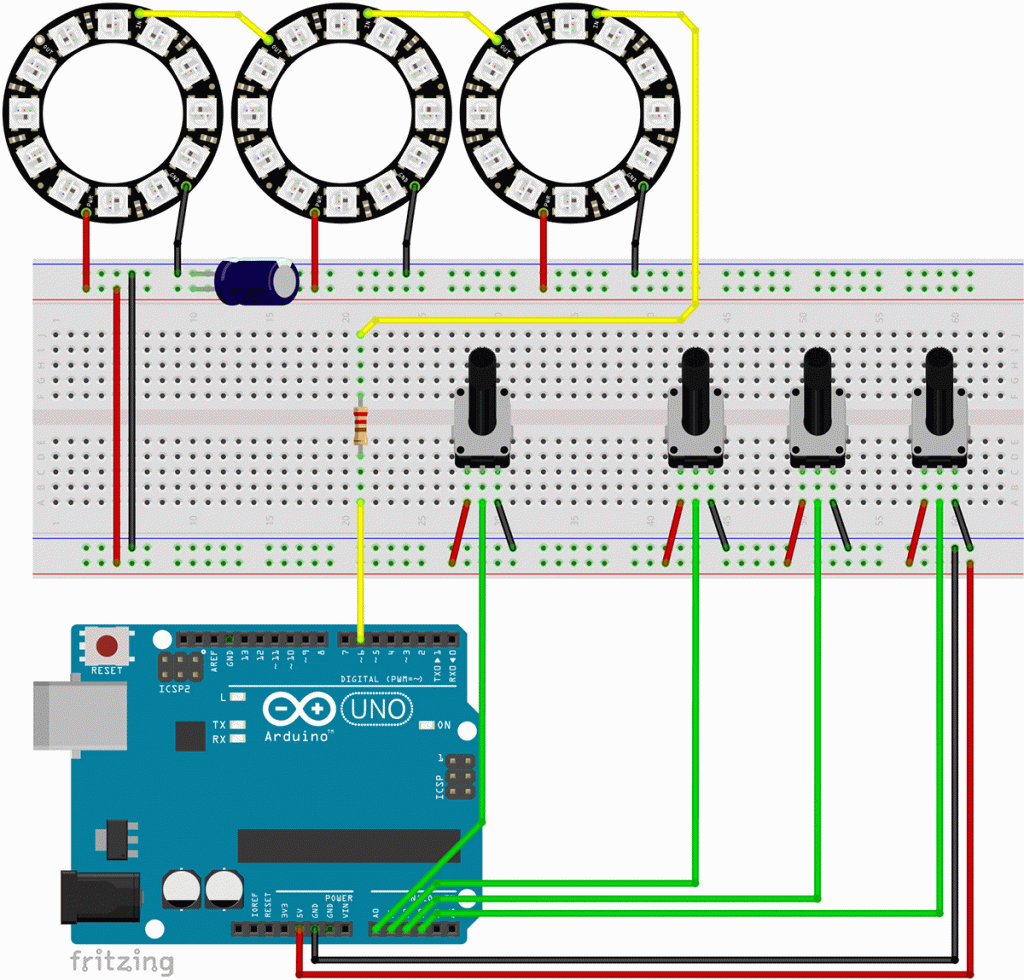
Die Schaltung besteht wie gesagt aus drei WS2812-RGB-LED-Ringen. Sie sind jeweils mit dem 5V+ und GND verbunden. Der D-OUT (Daten-Output) des ersten Rings ist mit dem D-IN (Daten-Input) des zweiten Ringes verbunden, der D-OUT des zweiten Rings mit dem D-IN des Dritten. Der D-IN des ersten Ringes ist über einen Widerstand (220 Ohm) mit dem digitalen Output-Pins des Arduino-Boards verbunden.
Vier Potentiometer sind jeweils mit äußeren Beinchen mit dem 5V+ und dem GND verbunden. Ihr mittleres Beinchen (Abgriff) ist mit den analogen Input-Pins A0, A1, A2 und A3 verbunden.
Darüber hinaus gibt es noch einen größeren Elektrolyt-Kondensator (ab 500µF), der den 5V+ und dem GND verbunden ist. Hierbei ist auf die richtige Polung zu achten.
Code: Leuchtende Ostereier mit Arduino
Der Code lässt sich einfach auf das Arduino-Board übertragen und schon geht es los :-)
#include <Adafruit_NeoPixel.h>
#ifdef __AVR__
#endif

#define LED_PIN    6
#define LED_COUNT 36 // 3x 12 WS2812 LEDs pro Ring

Adafruit_NeoPixel strip(LED_COUNT, LED_PIN, NEO_GRB + NEO_KHZ800);

int potPin1 = A0;
int potPin2 = A1;
int potPin3 = A2;
int potPin4 = A3;

void setup() {
  strip.begin();           // INITIALIZE NeoPixel strip object (REQUIRED)
  strip.show();            // Turn OFF all pixels ASAP
  strip.setBrightness(50); // Set BRIGHTNESS to about 1/5 (max = 255)
}

void loop() {
  int pot1 = analogRead(potPin1);
  if (pot1 < 200) {
    colorWipe(strip.ColorHSV(map(analogRead(potPin2), 0, 1024, 0, 65536)), 50, 0, 12);
    colorWipe(strip.ColorHSV(map(analogRead(potPin3), 0, 1024, 0, 65536)), 50, 12, 24);
    colorWipe(strip.ColorHSV(map(analogRead(potPin4), 0, 1024, 0, 65536)), 50, 24, 36);
  } else if (pot1 < 400) {
    theaterChase(strip.ColorHSV(map(analogRead(potPin2), 0, 1024, 0, 65536)), strip.ColorHSV(map(analogRead(potPin3), 0, 1024, 0, 65536)), strip.ColorHSV(map(analogRead(potPin4), 0, 1024, 0, 65536)), 50);
  } else if (pot1 < 600) {
    rainbow(10);
  } else if (pot1 < 800) {
    theaterChaseRainbow(50);
  } else {
    for (int i = 0; i < LED_COUNT; i++) {
      strip.setPixelColor(i, strip.Color(0,   0,   0));
    }
    strip.show();
  }
}

void colorWipe(uint32_t color, int wait, int firstLED, int lastLED) {
  for (int i = firstLED; i < lastLED; i++) { // For each pixel in strip...
    strip.setPixelColor(i, color);         //  Set pixel's color (in RAM)
    strip.show();                          //  Update strip to match
    if ((analogRead(potPin1) < 0) || (analogRead(potPin1) > 200)) break;
  }
}

void theaterChase(uint32_t color1, uint32_t color2, uint32_t color3, int wait) {
  for (int b = 0; b < 3; b++) { //  'b' counts from 0 to 2...
    strip.clear();         //   Set all pixels in RAM to 0 (off)
    // 'c' counts up from 'b' to end of strip in steps of 3...
    for (int c = b; c < 12; c += 3) {
      strip.setPixelColor(c, color1); // Set pixel 'c' to value 'color'
      strip.setPixelColor(c + 12, color2); // Set pixel 'c' to value 'color'
      strip.setPixelColor(c + 24, color3); // Set pixel 'c' to value 'color'
    }
    strip.show(); // Update strip with new contents
    delay(wait);  // Pause for a moment
    if ((analogRead(potPin1) < 200) || (analogRead(potPin1) > 400)) break;
  }
}

// Rainbow cycle along whole strip. Pass delay time (in ms) between frames.
void rainbow(int wait) {
  for (long firstPixelHue = 0; firstPixelHue < 5 * 65536; firstPixelHue += 256) {
    for (int i = 0; i < strip.numPixels(); i++) { // For each pixel in strip...
      int pixelHue = firstPixelHue + (i * 65536L / strip.numPixels());
      strip.setPixelColor(i, strip.gamma32(strip.ColorHSV(pixelHue)));
    }
    strip.show();
    delay(wait);
    if ((analogRead(potPin1) < 400) || (analogRead(potPin1) > 600)) break;
  }
}

// Rainbow-enhanced theater marquee. Pass delay time (in ms) between frames.
void theaterChaseRainbow(int wait) {
  int firstPixelHue = 0;     // First pixel starts at red (hue 0)
  for (int a = 0; a < 30; a++) { // Repeat 30 times...
    for (int b = 0; b < 3; b++) { //  'b' counts from 0 to 2...
      strip.clear();         //   Set all pixels in RAM to 0 (off)
      for (int c = b; c < strip.numPixels(); c += 3) {
        int      hue   = firstPixelHue + c * 65536L / strip.numPixels();
        uint32_t color = strip.gamma32(strip.ColorHSV(hue)); // hue -> RGB
        strip.setPixelColor(c, color); // Set pixel 'c' to value 'color'
      }
      strip.show();                // Update strip with new contents
      delay(wait);                 // Pause for a moment
      if ((analogRead(potPin1) < 600) || (analogRead(potPin1) > 800)) break;
      firstPixelHue += 65536 / 90; // One cycle of color wheel over 90 frames
    }
  }
}
Wenn dir das Projekt gefallen hat und du von weiteren interessanten Projekten inspiriert werden willst, sieh dir doch mal mein neues E-Book »Arduino Projekte Volume 1« an!
- Die beliebtesten Arduino-Projekte von StartHardware
- Inklusive Schaltplan, Beschreibung und Code
- Arduino-Schnellstart-Kapitel
- Kompakter Programmierkurs
[…] Leuchtende Ostereier mit Arduino […]
[…] Leuchtende Ostereier mit Arduino […]