Heute zeige ich dir, wie du mit einem Arduino und einer H-Bridge (L293D) zwei DC-Motoren steuern kannst. Du lernst, wie du die Drehrichtung umkehrst und die Geschwindigkeit über PWM regelst – perfekt für Roboter-Projekte, fahrende Plattformen oder andere bewegliche Konstruktionen: Arduino Motorsteuerung H-Bridge.
Eine H-Bridge ist eine elektronische Schaltung, die es ermöglicht, die Polarität der Spannung zu ändern und damit die Drehrichtung eines Motors zu steuern. Der L293D ist ein kompakter IC, der gleich zwei H-Bridges enthält und somit zwei Motoren unabhängig voneinander ansteuern kann. Diese Arduino Motorsteuerung H-Bridge ist der perfekte Einstieg in die Welt der Robotik.
Das brauchst du für die Arduino Motorsteuerung H-Bridge
Für dieses Projekt benötigst du folgende Bauteile:
- Arduino (Uno, Nano oder kompatibles Board) – Auf Amazon ansehen
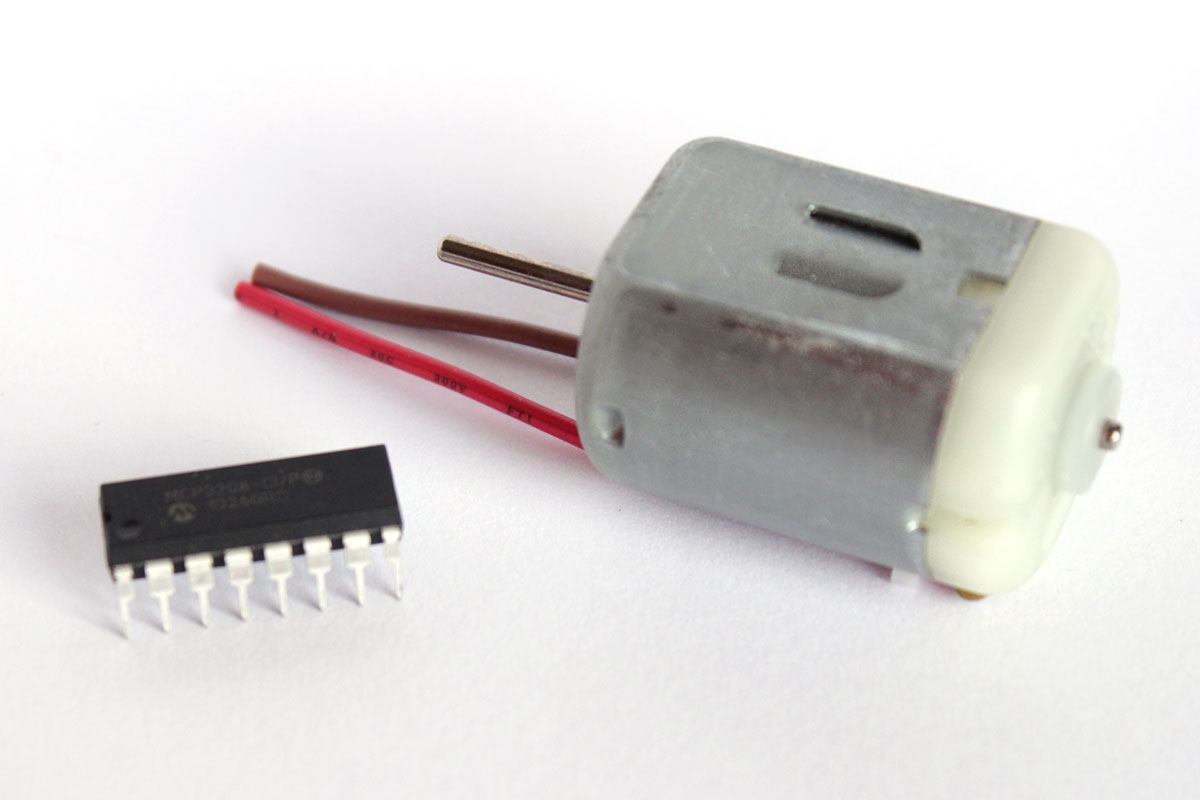
- L293D H-Bridge IC (DIL16-Gehäuse) – Auf Amazon ansehen
- 2x DC-Motoren (3-12V) – Auf Amazon ansehen
- Batterie oder Netzteil (6-12V) – Auf Amazon ansehen
- Breadboard – Auf Amazon ansehen
- Verbindungskabel (Jumper Wires) – Auf Amazon ansehen
Wichtig: Der L293D kann pro Kanal bis zu 600mA liefern. Für stärkere Motoren solltest du den L298N verwenden.
Technische Grundlagen zur H-Bridge
Was ist eine H-Bridge?
Eine H-Bridge besteht aus vier Schaltern (Transistoren), die in H-Form angeordnet sind. Durch gezieltes Öffnen und Schließen dieser Schalter kann ich den Stromfluss durch den Motor in beide Richtungen steuern:
- Vorwärts: Schalter 1 und 4 geschlossen → Motor dreht rechts
- Rückwärts: Schalter 2 und 3 geschlossen → Motor dreht links
- Bremsen: Beide Seiten auf LOW oder HIGH → Motor stoppt
Der L293D im Detail
Der L293D hat 16 Pins und folgende wichtige Anschlüsse, die du kennen solltest:
- Enable-Pins (1 und 9): Aktivieren die beiden Motoren (PWM-fähig für Geschwindigkeitsregelung)
- Input-Pins (2, 7, 10, 15): Steuersignale vom Arduino für Drehrichtung
- Output-Pins (3, 6, 11, 14): Verbindung zu den Motoren
- VCC1 (Pin 16): Logikspannung (5V vom Arduino)
- VCC2 (Pin 8): Motorspannung (externe Stromversorgung)
- GND (Pins 4, 5, 12, 13): Masse (alle verbinden!)
Verkabelung der Arduino Motorsteuerung H-Bridge


So verkabelst du die Schaltung Schritt für Schritt:
Arduino → L293D:
- Pin 9 → Enable 1 (Pin 1 am L293D) – Motor 1 Geschwindigkeit
- Pin 11 → Input 1 (Pin 2 am L293D) – Motor 1 Richtung A
- Pin 10 → Input 2 (Pin 7 am L293D) – Motor 1 Richtung B
- Pin 3 → Enable 2 (Pin 9 am L293D) – Motor 2 Geschwindigkeit
- Pin 6 → Input 3 (Pin 10 am L293D) – Motor 2 Richtung A
- Pin 5 → Input 4 (Pin 15 am L293D) – Motor 2 Richtung B
- 5V → VCC1 (Pin 16 am L293D)
- GND → GND (Pins 4, 5, 12, 13 am L293D)
L293D → Motoren:
- Output 1 (Pin 3) und Output 2 (Pin 6) → Motor 1
- Output 3 (Pin 11) und Output 4 (Pin 14) → Motor 2
Externe Stromversorgung:
- Plus-Pol der Batterie → VCC2 (Pin 8 am L293D)
- Minus-Pol der Batterie → GND (gemeinsam mit Arduino-GND)
Hinweis: Die gemeinsame Masse (GND) zwischen Arduino und externer Stromversorgung ist essentiell! Ohne diese Verbindung funktioniert deine Schaltung nicht.
Der Arduino-Code für die Motorsteuerung
Lade folgenden Code auf deinen Arduino:
int motor1_A=11;
int motor1_B=10;
int motor1_Speed=9;

int motor2_A=6;
int motor2_B=5;
int motor2_Speed=3;

void setup(){
  pinMode(motor1_A,OUTPUT);
  pinMode(motor1_B,OUTPUT);

  pinMode(motor2_A,OUTPUT);
  pinMode(motor2_B,OUTPUT);
}

void loop(){
  // motor1
  for (int i=0; i<256; i+=5){
    digitalWrite(motor1_A,HIGH); // A = HIGH and B = LOW means the motor will turn right
    digitalWrite(motor1_B,LOW);
    analogWrite(motor1_Speed,i); // speed counts from 0 to 255
    delay(20);
  }
  for (int i=255; i>0; i-=5){
    digitalWrite(motor1_A,HIGH); // A = HIGH and B = LOW means the motor will turn right
    digitalWrite(motor1_B,LOW);
    analogWrite(motor1_Speed,i); // speed counts from 0 to 255
    delay(20);
  }
  // motor2
  for (int i=0; i<256; i+=5){
    digitalWrite(motor2_A,HIGH); // A = HIGH and B = LOW means the motor will turn right
    digitalWrite(motor2_B,LOW);
    analogWrite(motor2_Speed,i); // speed counts from 0 to 255
    delay(20);
  }
  for (int i=255; i>0; i-=5){
    digitalWrite(motor2_A,HIGH); // A = HIGH and B = LOW means the motor will turn right
    digitalWrite(motor2_B,LOW);
    analogWrite(motor2_Speed,i); // speed counts from 0 to 255
    delay(20);
  }

  // turn vice versa

  // motor1
  for (int i=0; i<256; i+=5){
    digitalWrite(motor1_A,LOW); // A = LOW and B = HIGH means the motor will turn left
    digitalWrite(motor1_B,HIGH);
    analogWrite(motor1_Speed,i); // speed counts from 0 to 255
    delay(20);
  }
  for (int i=255; i>0; i-=5){
    digitalWrite(motor1_A,LOW); // A = LOW and B = HIGH means the motor will turn left
    digitalWrite(motor1_B,HIGH);
    analogWrite(motor1_Speed,i); // speed counts from 0 to 255
    delay(20);
  }
  // motor2
  for (int i=0; i<256; i+=5){
    digitalWrite(motor2_A,LOW); // A = LOW and B = HIGH means the motor will turn left
    digitalWrite(motor2_B,HIGH);
    analogWrite(motor2_Speed,i); // speed counts from 0 to 255
    delay(20);
  }
  for (int i=255; i>0; i-=5){
    digitalWrite(motor2_A,LOW); // A = LOW and B = HIGH means the motor will turn left
    digitalWrite(motor2_B,HIGH);
    analogWrite(motor2_Speed,i); // speed counts from 0 to 255
    delay(20);
  }
}
So funktioniert der Code:
- Pin-Definitionen: Jedem Motor weise ich drei Pins zu (A, B für Richtung, Speed für PWM)
- setup(): Ich konfiguriere alle Motor-Pins als OUTPUT
- loop(): Das Demo-Programm lässt beide Motoren nacheinander langsam anlaufen und wieder abbremsen – erst in eine Richtung (A=HIGH, B=LOW), dann in die andere (A=LOW, B=HIGH)
- analogWrite(): Damit regelst du die Geschwindigkeit von 0 (Stillstand) bis 255 (volle Kraft)
Mein Fazit zur Arduino Motorsteuerung H-Bridge
Mit der H-Bridge L293D und dem Arduino hast du nun eine flexible Motorsteuerung aufgebaut. Du kannst die Drehrichtung umkehren, die Geschwindigkeit präzise regeln und zwei Motoren unabhängig voneinander ansteuern – ideal für dein nächstes Roboter-Projekt!
Mögliche Erweiterungen, die ich dir empfehle:
- Infrarot-Fernbedienung zur Steuerung hinzufügen
- Sensoren integrieren (Ultraschall, Liniensensor)
- Für stärkere Motoren auf L298N upgraden
- Bluetooth-Modul einbauen für Smartphone-Steuerung
Viel Erfolg beim Nachbauen! Wenn du Fragen hast, schreib mir gerne einen Kommentar.
Wenn dir das Projekt gefallen hat und du von weiteren interessanten Projekten inspiriert werden willst, sieh dir doch mal mein neues E-Book »Arduino Projekte Volume 1« an!
- Die beliebtesten Arduino-Projekte von StartHardware
- Inklusive Schaltplan, Beschreibung und Code
- Arduino-Schnellstart-Kapitel
- Kompakter Programmierkurs
Arduino ist eine aus Soft- und Hardware bestehende Physical-Computing-Plattform. Beide Komponenten sind im Sinne von Open Source quelloffen. Wikipedia
Ich habe mein Problem gefixt.Brauchte sowieso nicht so viele Zeilen.
Hallo Stefan,
ich habe die Schaltung nachgebaut, allerdings mit nur einem Motor. Die Schaltung funktioniert auch, aber wenn ich die Motorbatterie abklemme, bekommt der Motor trotzdem Strom, dann wohl nur die 5V vom Arduino. Ich hätte erwartet, dass er dann trotz Enable Pin ausgeschaltet bleibt.
Wenn ich beide Batterien anschliesse (die für den Arduino und die separate Motorbatterie) scheint sich die Voltzahl sogar zu addieren. Kann das sein ? Oder ist mir der IC durchgebrannt ?
Gruss,
Achim
Hallo Stefan,
Ich habe eine kurze Verständnisfrage zur oben abgebildeten Schaltung: warum ist der GND des L293D sowohl mit dem GND des arduino als auch der Stromquelle verbunden? Reicht die Verbindung zur Stromquelle nicht aus?
Schöne grüße,
Konne
Hallo Stefan,
ich möchte einen Aufzug bauen, der von einem Arduino-Board gesteuert wird.
Als Motor verwende ich den Mini Motor (Leerlaufdrehzahl: ca. 9.500 U/min, Maximale Stromaufnahme: 0,65 A, max. Drehmoment: ca. 0,4 Ncm) von Fischertechnik. Da die Spannung von den Pins des Arduinos für den Motor zu klein ist, möchte ich eine 9-Volt-Batterie über die H-Brücke L293D anschließen.
Dazu hätte ich noch ein paar Fragen:
Für das Ansteuern von einem Motor kann ich doch den Aufbau aus Deinem Video „Wie steuert man einen Motor mit Arduino“ verwenden?
Ist die H-Brücke ausreichend? (Ich habe gelesen, dass die L293D nur bis zu einer Stromstärke von 0,6A funktioniert und man bei einer höheren Stromstärke eine andere H-Brücke bräuchte.)
Lassen sich weitere Bauteile wie Taster an den 5 Volt Pin anschließen und muss ich noch etwas beachten (Vorwiderstand…)?
Ich hoffe Du kannst mir helfen :)
Hallo,
kannst du bitte die fritzing datei bereit stellen?
Das wäre super.
Hallo Sara,
also im ersten Teil dreht der erste Motor rechts schneller und dann wieder langsamer werdend. Danach passiert das gleiche mit dem zweiten Motor.
Im zweiten Teil passiert noch mal genau das selbe, jedoch drehen sich die Motoren in entgegengesetzter Richtung – erst der eine, dann der andere.
Viel Spaß beim Nachbauen.
Liebe Grüße
Stefan“
Hallo Stefan,
ich hab vor deine Schaltung genau nach zubauen, aber was genau bewirkt dein Beispielcode? Fangen die Motoren dann an zulaufen? Beide gleichzeitig?
Danke Liebe Grüße Sara
@Max: Kann mir gerade nicht genau vorstellen, wie Ihr das vorhabt, aber wären da Servo-Motoren nicht geeigneter und leichter anzubauen?
Liebe Grüße
Stefan“
Hallo Stefan,
wir haben so ein Roboter-Arm den wir auf einem Fahrgestell (magician chassis dg007) montieren wollen. Würde das eventuell funktionieren ?
lg Max