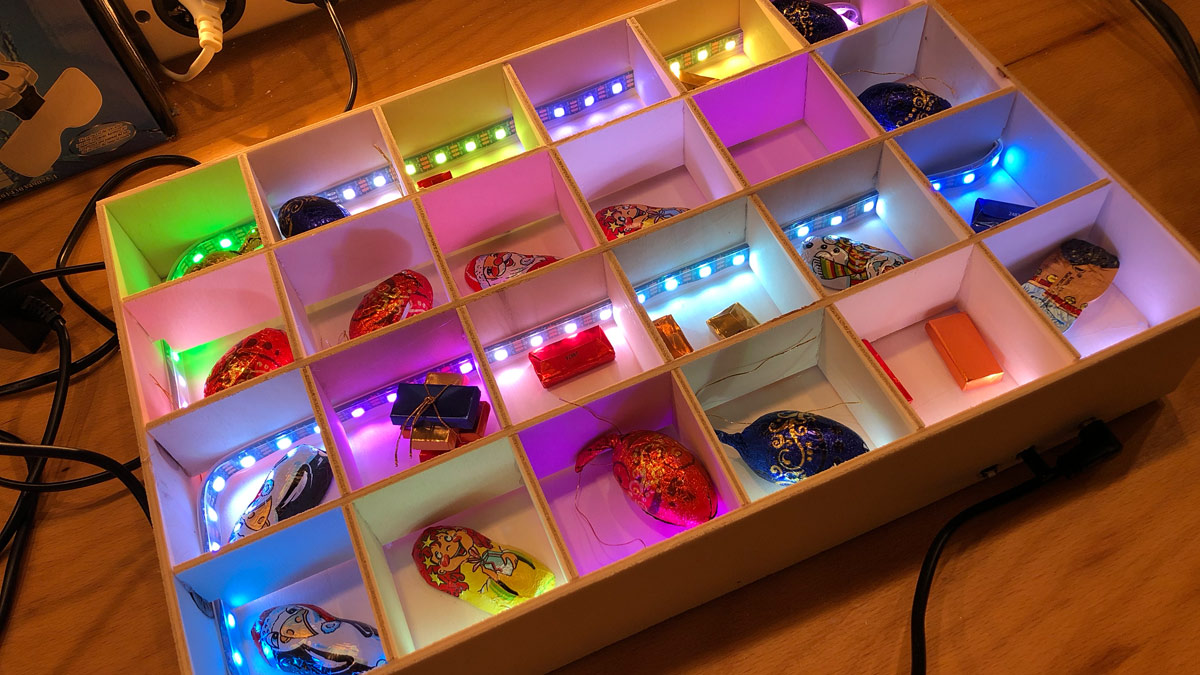
In diesem Artikel zeige ich dir, wie du einen leuchtenden Adventskalender mit Arduino bauen kannst. Der Rahmen ist aus Sperrholz und bei den verwendeten LEDs handelt es sich um einen WS2812 LED-Streifen. Los geht’s!
- WS2812 LED-Strip
- Netzteil
- Hohlstecker-Buchse
- Kondensator 1000µF
- Bastelsperrholz (Bekommt man auch super im Baumarkt)
- Tiny RTC
- Batterie für Tiny RTC
Bauplan für den Adventskalender mit Arduino
Als Erstes fangen wir mit dem Kalender an. Er setzt sich aus Sperrholzstreben zusammen. In diesem Bauplan (PDF) kannst du dir die genauen Maße ansehen. Ich habe Bastelsperrholz (Pappel) in A3 benutzt. Es hat eine Stärke von 4mm und lässt sich super bearbeiten. Wenn du magst, kannst du die Baupläne einfach ausdrucken und mit Sprühkleber auf die Holzbögen kleben. Später lässt sich das Papier wieder abziehen.
Schleife die Kanten, falls diese noch rau sind, dann klebe die Teile mit Heißkleber zusammen. Das geht schnell und man muss nicht auf Trocknungszeiten warten.
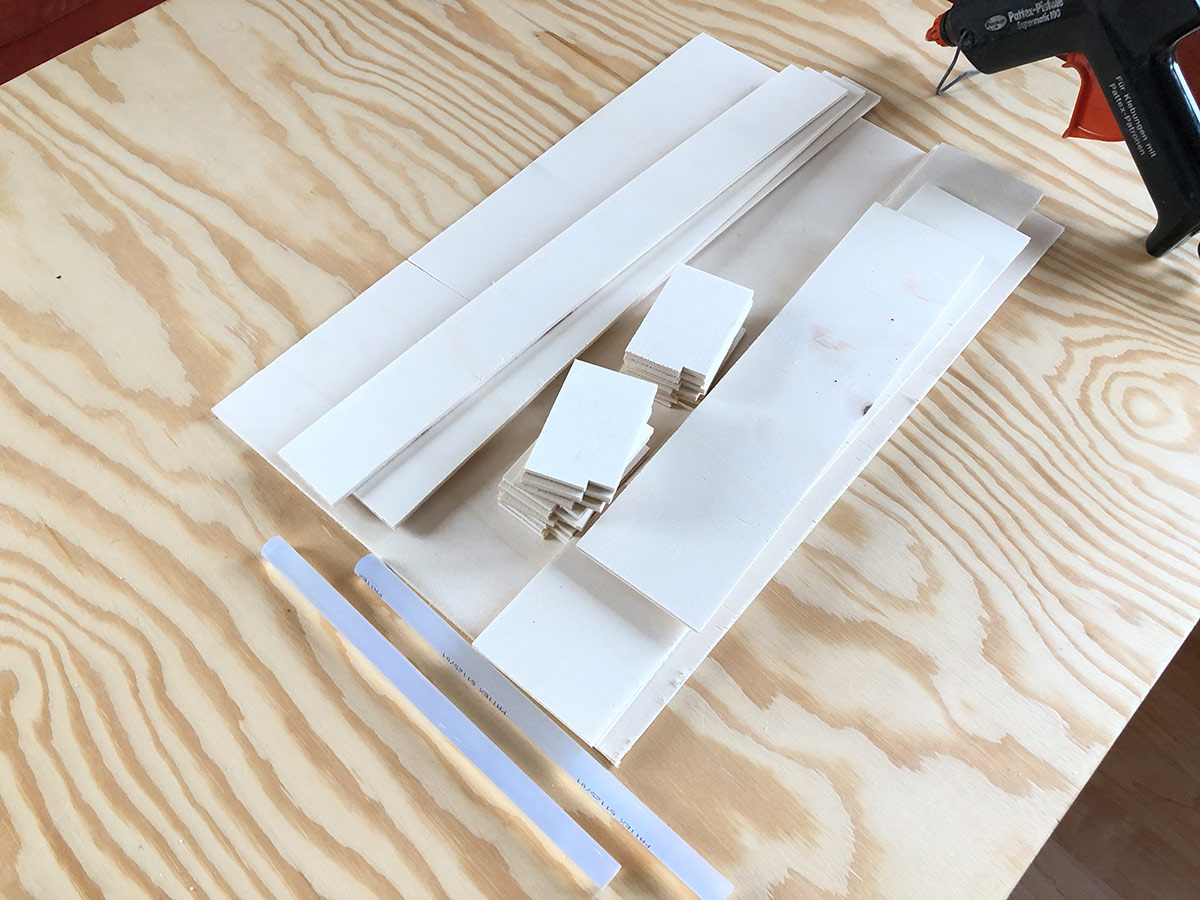


Wichtig ist, dass die Ausschnitte für den Leuchtstreifen an den richtigen Stellen sind. Achte hier besonders drauf. Die kleinen Holzbrettchen müssen genau eine Eigenbreite zum Rand und dem nächsten Holzbrettchen haben. Du kannst sie also als Abstandshalter verwenden.
Am Ende kannst den Leuchtstreifen einlegen. Die LEDs sollten zu den anderen Kästchen in einer Reihe sein. Führe die Enden des Leuchtstreifens durch die Grundplatte auf die Rückseite. Wenn der Leuchtstreifen zu lang ist, kannst du ihn abschneiden, oder einfach auf der Rückseite einrollen. Dann kannst du ihn nach Weihnachten für etwas anderes verwenden.
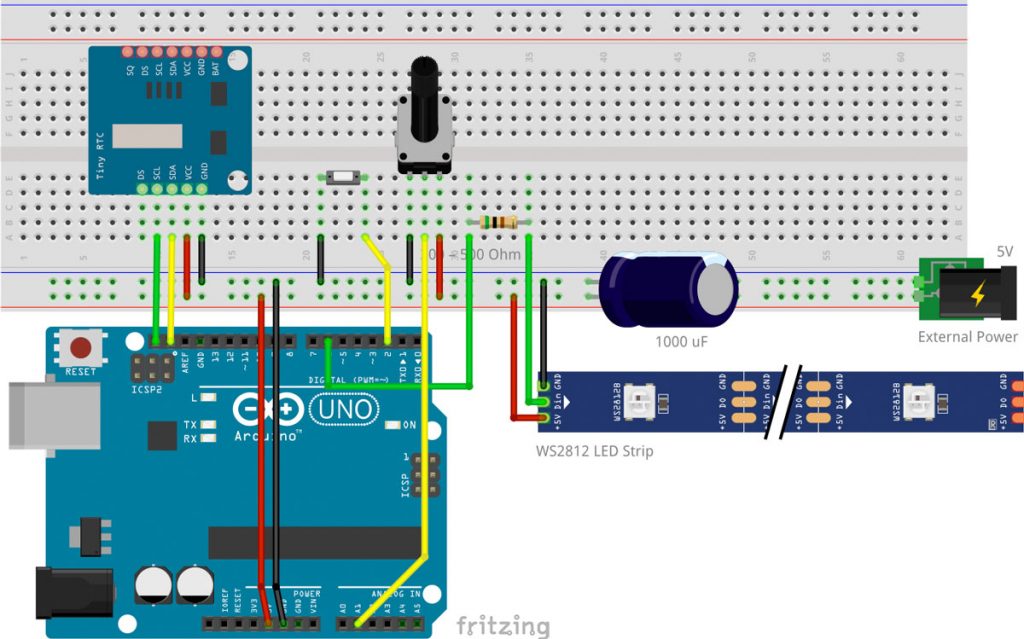
Schaltplan für den Adventskalender mit Arduino
Für den Adventskalender verwenden wir ein Tiny RTC Modul. Es basiert auf dem DS1307-Chip und liefert uns das Datum und die Uhrzeit. Um den WS2812-LED-Streifen nicht zu beschädigen, gilt es ein paar Regeln zu beachten. Dazu zählt ein großer Elektrolytkondensator zwischen Plus und GND und ein Widerstand vor dem Daten-In-Pin des Leuchtstreifens. Dieser sollte möglichst nahe am Leuchtstreifen platziert sein. Da der Leuchtstreifen doch einiges an Energie benötigt, verwenden wir ein externes Netzteil. Es versorgt praktischerweise das Arduino gleich mit. Es sollte eine Spannung von 5V und einen Strom von drei Ampere liefern.
Programm-Code
Der Code setzt sich aus dem Grund-Code für die Real Time Clock und einem Code für die WS2812-LEDs zusammen. Das Programm hat vier Modi:
- Fade langsam alle Farben
- Fade langsam weihnachtliche Farben
- Fade schnell alle Farben (Disco)
- Zeige nur das Türchen
Diese Modi kann man mit dem Button an Pin 2 durchschalten. Zusätzlich lässt sich die Helligkeit mit dem Potentiometer regeln.
Falls du nicht weißt wie du die Libraries installierst habe ich hier ein Tutorial für dich erstellt.
#include <Wire.h> // must be included here so that Arduino library object file references work
#include <RtcDS1307.h>
#include <Adafruit_NeoPixel.h>

#define LED_COUNT 109
#define LED_PIN    6
#define POT_PIN 1
#define countof(a) (sizeof(a) / sizeof(a[0]))

int theDoors[] = {4, 4, 4, 4, 4, 7, 7, 4, 4, 4, 4, 4, 4, 4, 4, 4, 4, 7, 7, 4, 4, 4, 4, 4};
int theNumbers[] = {20, 9, 2, 18, 7, 11, 13, 17, 10, 21, 3, 15, 5, 1, 16, 8, 24, 14, 6, 22, 4, 12, 19, 23};

int changeSpeed = 1;

/* Colors */
int targetColor[24][3] = {{0, 0, 0}, {0, 0, 0}, {0, 0, 0}, {0, 0, 0}, {0, 0, 0}, {0, 0, 0}, {0, 0, 0}, {0, 0, 0}, {0, 0, 0}, {0, 0, 0}, {0, 0, 0}, {0, 0, 0}, {0, 0, 0}, {0, 0, 0}, {0, 0, 0}, {0, 0, 0}, {0, 0, 0}, {0, 0, 0}, {0, 0, 0}, {0, 0, 0}, {0, 0, 0}, {0, 0, 0}, {0, 0, 0}, {0, 0, 0}};
int currentColor[24][3] = {{0, 0, 0}, {0, 0, 0}, {0, 0, 0}, {0, 0, 0}, {0, 0, 0}, {0, 0, 0}, {0, 0, 0}, {0, 0, 0}, {0, 0, 0}, {0, 0, 0}, {0, 0, 0}, {0, 0, 0}, {0, 0, 0}, {0, 0, 0}, {0, 0, 0}, {0, 0, 0}, {0, 0, 0}, {0, 0, 0}, {0, 0, 0}, {0, 0, 0}, {0, 0, 0}, {0, 0, 0}, {0, 0, 0}, {0, 0, 0}};

int theDay = 0;
int today = 10;

int buttonPin = 2;

int myState = 1;
int maxState = 4;

// Declare our NeoPixel strip object:
Adafruit_NeoPixel strip(LED_COUNT, LED_PIN, NEO_GRB + NEO_KHZ800);
// Argument 1 = Number of pixels in NeoPixel strip
// Argument 2 = Arduino pin number (most are valid)
// Argument 3 = Pixel type flags, add together as needed:
//   NEO_KHZ800  800 KHz bitstream (most NeoPixel products w/WS2812 LEDs)
//   NEO_KHZ400  400 KHz (classic 'v1' (not v2) FLORA pixels, WS2811 drivers)
//   NEO_GRB     Pixels are wired for GRB bitstream (most NeoPixel products)
//   NEO_RGB     Pixels are wired for RGB bitstream (v1 FLORA pixels, not v2)
//   NEO_RGBW    Pixels are wired for RGBW bitstream (NeoPixel RGBW products)

RtcDS1307<TwoWire> Rtc(Wire);

const char data[] = "what time is it";

void setup () {
  Serial.begin(57600);

  pinMode(buttonPin, INPUT_PULLUP);

  strip.begin();           // INITIALIZE NeoPixel strip object (REQUIRED)
  strip.show();            // Turn OFF all pixels ASAP
  strip.setBrightness(250); // Set BRIGHTNESS to about 1/5 (max = 255)

  rtcSetup();
}

void loop () {

  strip.setBrightness(analogRead(POT_PIN) / 4);

  Serial.println(myState);
  if (millis() % 5000 == 1) timeDateFunctions();

  switch (myState) {
    case 1:
      if (millis() % 10 == 1) {
        targetColor[int(random(24))][int(random(3))] = random(255);
        changeSpeed = 1;
      }
      break;

    case 2:
      if (millis() % 10 == 1) {
        targetColor[int(random(24))][int(random(2))] = random(255);
        for (int i = 0; i < 24; i++) {
          targetColor[i][2] = 0;
          currentColor[i][2] = 0;
        }
        changeSpeed = 1;
      }
      break;

    case 3:

      if (millis() % 5 == 1) {
        targetColor[int(random(24))][int(random(3))] = random(25) * 10;
        changeSpeed = 10;
      }

      if (millis() % 7 == 1) {
        targetColor[int(random(24))][int(random(3))] = 0;
        changeSpeed = 10;
      }

      break;

    case 4:
      for (int i = 0; i < 24; i++) {
        for (int c = 0; c < 3; c++) {
          targetColor[i][c] = 0;
          currentColor[i][c] = 0;
        }
      }
      break;
  }

  colorTransition();

  showDoor();
  strip.show();

  if (digitalRead(buttonPin) == LOW) {
    delay(200);
    myState++;
    if (myState > maxState) myState = 1;
    strip.clear();
    strip.show();
  }

  delay(1);
}

void colorTransition() {

  for (int i = 0; i < 24; i++) {
    for (int c = 0; c < 3; c++) {
      if ((currentColor[i][c] > targetColor[i][c] + changeSpeed) || (currentColor[i][c] < targetColor[i][c] - changeSpeed)) {
        if (currentColor[i][c] > targetColor[i][c]) {
          currentColor[i][c] -= changeSpeed;
        } else {
          currentColor[i][c] += changeSpeed;
        }
      }
    }
  }

  for (int days = 0; days < 24; days++) {
    setDayColor(days, strip.Color(currentColor[days][0], currentColor[days][1], currentColor[days][2]));
  }

  showDoor();
  strip.show();
}

void setDayColor(int myDay, uint32_t color) {
  int myDayLedIndex = 0;
  for (int i = 0; i < myDay; i++) {
    myDayLedIndex += theDoors[i];
  }
  for (int i = myDayLedIndex; i < myDayLedIndex + theDoors[myDay]; i++) {
    strip.setPixelColor(i, color);
  }
}

void showDoor() {
  if ((today > 0) && (today < 25)) {
    int currentDoorStart = 0;
    for (int i = 0; i < theDay; i++) {
      currentDoorStart += theDoors[i];
    }
    for (int i = currentDoorStart; i < currentDoorStart + theDoors[theDay]; i++) {
      strip.setPixelColor(i, strip.Color(255, 255, 255));
    }
  }
  strip.show();
}

/* **** **** ***** ***** ***** */


// Some functions of our own for creating animated effects -----------------

void rtcSetup() {
  Serial.print("compiled: ");
  Serial.print(__DATE__);
  Serial.println(__TIME__);

  //--------RTC SETUP ------------
  // if you are using ESP-01 then uncomment the line below to reset the pins to
  // the available pins for SDA, SCL
  // Wire.begin(0, 2); // due to limited pins, use pin 0 and 2 for SDA, SCL

  Rtc.Begin();

  RtcDateTime compiled = RtcDateTime(__DATE__, __TIME__);
  printDateTime(compiled);
  Serial.println();

  if (!Rtc.IsDateTimeValid())
  {
    if (Rtc.LastError() != 0)
    {
      // we have a communications error
      // see https://www.arduino.cc/en/Reference/WireEndTransmission for
      // what the number means
      Serial.print("RTC communications error = ");
      Serial.println(Rtc.LastError());
    }
    else
    {
      Serial.println("RTC lost confidence in the DateTime!");
      Rtc.SetDateTime(compiled);
    }
  }

  if (!Rtc.GetIsRunning())
  {
    Serial.println("RTC was not actively running, starting now");
    Rtc.SetIsRunning(true);
  }

  RtcDateTime now = Rtc.GetDateTime();
  if (now < compiled)
  {
    Serial.println("RTC is older than compile time!  (Updating DateTime)");
    Rtc.SetDateTime(compiled);
  }

  // never assume the Rtc was last configured by you, so
  // just clear them to your needed state
  Rtc.SetSquareWavePin(DS1307SquareWaveOut_Low);

  /* comment out on a second run to see that the info is stored long term */
  // Store something in memory on the RTC
  Rtc.SetMemory(0, 13);
  uint8_t written = Rtc.SetMemory(13, (const uint8_t*)data, sizeof(data) - 1); // remove the null terminator strings add
  Rtc.SetMemory(1, written);
  /* end of comment out section */
}

void timeDateFunctions() {
  if (!Rtc.IsDateTimeValid())
  {
    if (Rtc.LastError() != 0)
    {
      // we have a communications error
      // see https://www.arduino.cc/en/Reference/WireEndTransmission for
      // what the number means
      Serial.print("RTC communications error = ");
      Serial.println(Rtc.LastError());
    }
    else
    {
      // Common Causes:
      //    1) the battery on the device is low or even missing and the power line was disconnected
      Serial.println("RTC lost confidence in the DateTime!");
    }
  }

  RtcDateTime now = Rtc.GetDateTime();

  printDateTime(now);
  Serial.println();

  // read data

  // get the offset we stored our data from address zero
  uint8_t address = Rtc.GetMemory(0);
  if (address != 13)
  {
    Serial.println("address didn't match");
  }
  else
  {
    // get the size of the data from address 1
    uint8_t count = Rtc.GetMemory(1);
    uint8_t buff[20];

    // get our data from the address with the given size
    uint8_t gotten = Rtc.GetMemory(address, buff, count);

    if (gotten != count ||
        count != sizeof(data) - 1) // remove the extra null terminator strings add
    {
      Serial.print("something didn't match, count = ");
      Serial.print(count, DEC);
      Serial.print(", gotten = ");
      Serial.print(gotten, DEC);
      Serial.println();
    }
    Serial.print("data read (");
    Serial.print(gotten);
    Serial.print(") = \"");
    for (uint8_t ch = 0; ch < gotten; ch++)
    {
      Serial.print((char)buff[ch]);
    }
    Serial.println("\"");
  }
}

void printDateTime(const RtcDateTime& dt)
{
  char datestring[20];

  snprintf_P(datestring,
             countof(datestring),
             PSTR("%02u/%02u/%04u %02u:%02u:%02u"),
             dt.Month(),
             dt.Day(),
             dt.Year(),
             dt.Hour(),
             dt.Minute(),
             dt.Second() );
  Serial.print(datestring);
  today = dt.Day();

  for (int i = 0; i < 24; i++) {
    if (theNumbers[i] == (today)) theDay = i;
  }
}
#include <Wire.h> // must be included here so that Arduino library object file references work
#include <RtcDS1307.h>
#include <Adafruit_NeoPixel.h>

#define LED_COUNT 109
#define LED_PIN    6
#define POT_PIN 1
#define countof(a) (sizeof(a) / sizeof(a[0]))

int theDoors[] = {4, 4, 4, 4, 4, 7, 7, 4, 4, 4, 4, 4, 4, 4, 4, 4, 4, 7, 7, 4, 4, 4, 4, 4};
int theNumbers[] = {20, 9, 2, 18, 7, 11, 13, 17, 10, 21, 3, 15, 5, 1, 16, 8, 24, 14, 6, 22, 4, 12, 19, 23};

int changeSpeed = 1;

/* Colors */
int targetColor[24][3] = {{0, 0, 0}, {0, 0, 0}, {0, 0, 0}, {0, 0, 0}, {0, 0, 0}, {0, 0, 0}, {0, 0, 0}, {0, 0, 0}, {0, 0, 0}, {0, 0, 0}, {0, 0, 0}, {0, 0, 0}, {0, 0, 0}, {0, 0, 0}, {0, 0, 0}, {0, 0, 0}, {0, 0, 0}, {0, 0, 0}, {0, 0, 0}, {0, 0, 0}, {0, 0, 0}, {0, 0, 0}, {0, 0, 0}, {0, 0, 0}};
int currentColor[24][3] = {{0, 0, 0}, {0, 0, 0}, {0, 0, 0}, {0, 0, 0}, {0, 0, 0}, {0, 0, 0}, {0, 0, 0}, {0, 0, 0}, {0, 0, 0}, {0, 0, 0}, {0, 0, 0}, {0, 0, 0}, {0, 0, 0}, {0, 0, 0}, {0, 0, 0}, {0, 0, 0}, {0, 0, 0}, {0, 0, 0}, {0, 0, 0}, {0, 0, 0}, {0, 0, 0}, {0, 0, 0}, {0, 0, 0}, {0, 0, 0}};

int theDay = 0;
int today = 10;

int buttonPin = 2;

int myState = 1;
int maxState = 4;

// Declare our NeoPixel strip object:
Adafruit_NeoPixel strip(LED_COUNT, LED_PIN, NEO_GRB + NEO_KHZ800);
// Argument 1 = Number of pixels in NeoPixel strip
// Argument 2 = Arduino pin number (most are valid)
// Argument 3 = Pixel type flags, add together as needed:
//   NEO_KHZ800  800 KHz bitstream (most NeoPixel products w/WS2812 LEDs)
//   NEO_KHZ400  400 KHz (classic 'v1' (not v2) FLORA pixels, WS2811 drivers)
//   NEO_GRB     Pixels are wired for GRB bitstream (most NeoPixel products)
//   NEO_RGB     Pixels are wired for RGB bitstream (v1 FLORA pixels, not v2)
//   NEO_RGBW    Pixels are wired for RGBW bitstream (NeoPixel RGBW products)

RtcDS1307<TwoWire> Rtc(Wire);

const char data[] = "what time is it";

void setup () {
  Serial.begin(57600);

  pinMode(buttonPin, INPUT_PULLUP);

  strip.begin();           // INITIALIZE NeoPixel strip object (REQUIRED)
  strip.show();            // Turn OFF all pixels ASAP
  strip.setBrightness(250); // Set BRIGHTNESS to about 1/5 (max = 255)

  rtcSetup();
}

void loop () {

  strip.setBrightness(analogRead(POT_PIN) / 4);

  Serial.println(myState);
  if (millis() % 5000 == 1) timeDateFunctions();

  switch (myState) {
    case 1:
      if (millis() % 10 == 1) {
        targetColor[int(random(24))][int(random(3))] = random(255);
        changeSpeed = 1;
      }
      break;

    case 2:
      if (millis() % 10 == 1) {
        targetColor[int(random(24))][int(random(2))] = random(255);
        for (int i = 0; i < 24; i++) {
          targetColor[i][2] = 0;
          currentColor[i][2] = 0;
        }


        changeSpeed = 1;
      }
      break;

    case 3:

      if (millis() % 5 == 1) {
        targetColor[int(random(24))][int(random(3))] = random(25) * 10;
        changeSpeed = 10;
      }

      if (millis() % 7 == 1) {
        targetColor[int(random(24))][int(random(3))] = 0;
        changeSpeed = 10;
      }

      break;

    case 4:
      for (int i = 0; i < 24; i++) {
        for (int c = 0; c < 3; c++) {
          targetColor[i][c] = 0;
          currentColor[i][c] = 0;
        }
      }
      break;
  }

  colorTransition();

  showDoor();
  strip.show();

  if (digitalRead(buttonPin) == LOW) {
    delay(200);
    myState++;
    if (myState > maxState) myState = 1;
    strip.clear();
    strip.show();
  }

  delay(1);
}

void colorTransition() {

  for (int i = 0; i < 24; i++) {
    for (int c = 0; c < 3; c++) {
      if ((currentColor[i][c] > targetColor[i][c] + changeSpeed) || (currentColor[i][c] < targetColor[i][c] - changeSpeed)) {
        if (currentColor[i][c] > targetColor[i][c]) {
          currentColor[i][c] -= changeSpeed;
        } else {
          currentColor[i][c] += changeSpeed;
        }
      }
    }
  }

  for (int days = 0; days < 24; days++) {
    setDayColor(days, strip.Color(currentColor[days][0], currentColor[days][1], currentColor[days][2]));
  }

  showDoor();
  strip.show();
}

void setDayColor(int myDay, uint32_t color) {
  int myDayLedIndex = 0;
  for (int i = 0; i < myDay; i++) {
    myDayLedIndex += theDoors[i];
  }
  for (int i = myDayLedIndex; i < myDayLedIndex + theDoors[myDay]; i++) {
    strip.setPixelColor(i, color);
  }
}

void showDoor() {
  if ((today > 0) && (today < 25)) {
    int currentDoorStart = 0;
    for (int i = 0; i < theDay; i++) {
      currentDoorStart += theDoors[i];
    }
    for (int i = currentDoorStart; i < currentDoorStart + theDoors[theDay]; i++) {
      strip.setPixelColor(i, strip.Color(255, 255, 255));
    }
  }
  strip.show();
}

/* **** **** ***** ***** ***** */


// Some functions of our own for creating animated effects -----------------

void rtcSetup() {
  Serial.print("compiled: ");
  Serial.print(__DATE__);
  Serial.println(__TIME__);

  //--------RTC SETUP ------------
  // if you are using ESP-01 then uncomment the line below to reset the pins to
  // the available pins for SDA, SCL
  // Wire.begin(0, 2); // due to limited pins, use pin 0 and 2 for SDA, SCL

  Rtc.Begin();

  RtcDateTime compiled = RtcDateTime(__DATE__, __TIME__);
  printDateTime(compiled);
  Serial.println();

  if (!Rtc.IsDateTimeValid())
  {
    if (Rtc.LastError() != 0)
    {
      // we have a communications error
      // see https://www.arduino.cc/en/Reference/WireEndTransmission for
      // what the number means
      Serial.print("RTC communications error = ");
      Serial.println(Rtc.LastError());
    }
    else
    {
      Serial.println("RTC lost confidence in the DateTime!");
      Rtc.SetDateTime(compiled);
    }
  }

  if (!Rtc.GetIsRunning())
  {
    Serial.println("RTC was not actively running, starting now");
    Rtc.SetIsRunning(true);
  }

  RtcDateTime now = Rtc.GetDateTime();
  if (now < compiled)
  {
    Serial.println("RTC is older than compile time!  (Updating DateTime)");
    Rtc.SetDateTime(compiled);
  }

  // never assume the Rtc was last configured by you, so
  // just clear them to your needed state
  Rtc.SetSquareWavePin(DS1307SquareWaveOut_Low);

  /* comment out on a second run to see that the info is stored long term */
  // Store something in memory on the RTC
  Rtc.SetMemory(0, 13);
  uint8_t written = Rtc.SetMemory(13, (const uint8_t*)data, sizeof(data) - 1); // remove the null terminator strings add
  Rtc.SetMemory(1, written);
  /* end of comment out section */
}

void timeDateFunctions() {
  if (!Rtc.IsDateTimeValid())
  {
    if (Rtc.LastError() != 0)
    {
      // we have a communications error
      // see https://www.arduino.cc/en/Reference/WireEndTransmission for
      // what the number means
      Serial.print("RTC communications error = ");
      Serial.println(Rtc.LastError());
    }
    else
    {
      // Common Causes:
      //    1) the battery on the device is low or even missing and the power line was disconnected
      Serial.println("RTC lost confidence in the DateTime!");
    }
  }

  RtcDateTime now = Rtc.GetDateTime();

  printDateTime(now);
  Serial.println();

  // read data

  // get the offset we stored our data from address zero
  uint8_t address = Rtc.GetMemory(0);
  if (address != 13)
  {
    Serial.println("address didn't match");
  }
  else
  {
    // get the size of the data from address 1
    uint8_t count = Rtc.GetMemory(1);
    uint8_t buff[20];

    // get our data from the address with the given size
    uint8_t gotten = Rtc.GetMemory(address, buff, count);

    if (gotten != count ||
        count != sizeof(data) - 1) // remove the extra null terminator strings add
    {
      Serial.print("something didn't match, count = ");
      Serial.print(count, DEC);
      Serial.print(", gotten = ");
      Serial.print(gotten, DEC);
      Serial.println();
    }
    Serial.print("data read (");
    Serial.print(gotten);
    Serial.print(") = \"");
    for (uint8_t ch = 0; ch < gotten; ch++)
    {
      Serial.print((char)buff[ch]);
    }
    Serial.println("\"");
  }


}

void printDateTime(const RtcDateTime& dt)
{
  char datestring[20];

  snprintf_P(datestring,
             countof(datestring),
             PSTR("%02u/%02u/%04u %02u:%02u:%02u"),
             dt.Month(),
             dt.Day(),
             dt.Year(),
             dt.Hour(),
             dt.Minute(),
             dt.Second() );
  Serial.print(datestring);
  today = dt.Day();

  for (int i = 0; i < 24; i++) {
    if (theNumbers[i] == (today)) theDay = i;
  }
}
Ich hab mir Mühe gegeben, der Code ist trotzdem etwas unübersichtlich. Ich hoffe, du kannst trotzdem was damit anfangen. Es ist wirklich ein lustiges Projekt. Viel Spaß bei der Umsetzung!
Wenn dir das Projekt gefallen hat und du von weiteren interessanten Projekten inspiriert werden willst, sieh dir doch mal mein neues E-Book »Arduino Projekte Volume 1« an!
- Die beliebtesten Arduino-Projekte von StartHardware
- Inklusive Schaltplan, Beschreibung und Code
- Arduino-Schnellstart-Kapitel
- Kompakter Programmierkurs